
Bitnami has made many structural changes in its stacks. This is the latest guide according to the latest file structure of the Bitnami WordPress NGINX stack 2021. This tutorial guide will discuss how to enable an HTTPS secure server on your WordPress with NGINX and SSL Certified by Bitnami and Automattic stack image. This will make the website more secure, enhance the user experience, Boost SEO, and much more.
Install an SSL certificate for your Bitnami nginx WordPress stack image.
Using Let’s Encrypt, you can install the SSL certificate for your Bitnami NGINX WordPress stack for free. For this, first, you’ve to set the domain name for your WordPress website.
bitnami-wordpress-nginx-ssl-certificate-install
Now open the SSL terminal of the virtual machine. If you don’t know how to open the terminal, learn here.
Generate SSL for your Domain
To generate SSL (Secure Sockets Layer), you must get in with root permission.
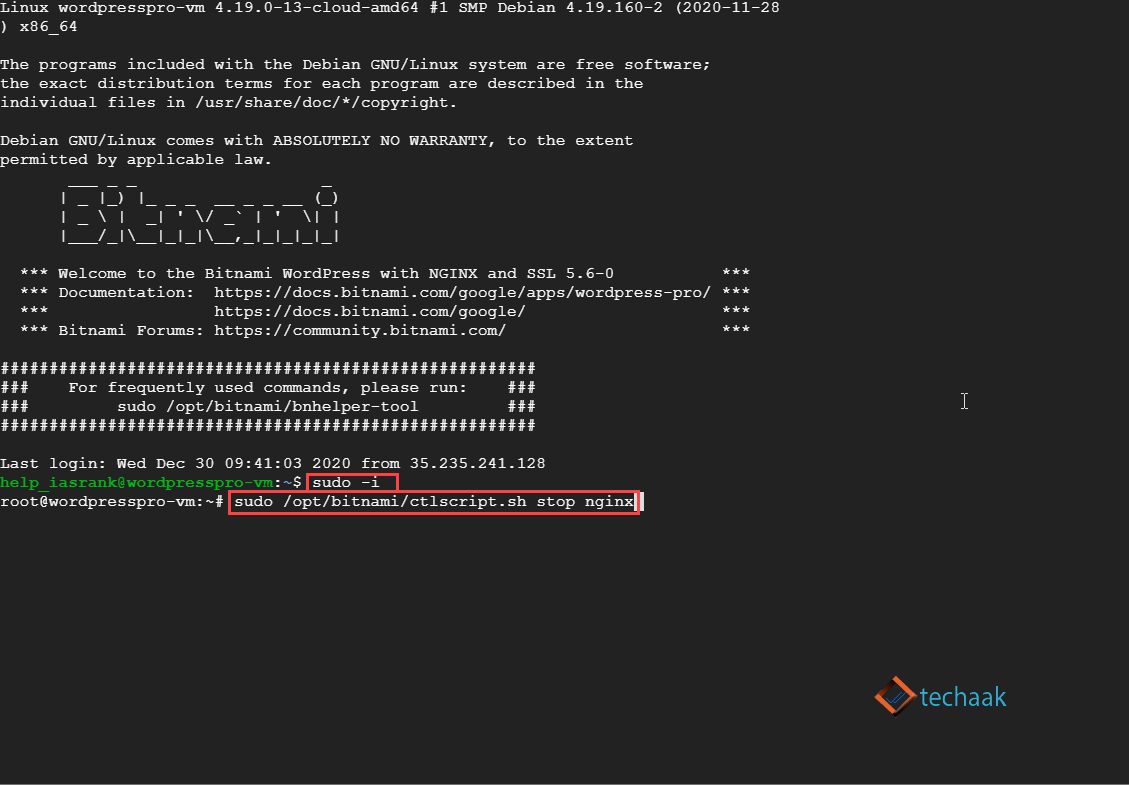
Stop the Bitnami NGINX server.
Now stop the nginx server of your WordPress application. To exclude this operation paste the following command one by one.
In the latest release of WordPress NGINX, lego is not installed, although it is mentioned in the stack, it is not. So first, we’ve to install the lego into the stack and then generate an SSL certificate for the WordPress website.
Execute the following command line one by one.
cd /tmp
curl -Ls https://api.github.com/repos/xenolf/lego/releases/latest | grep browser_download_url | grep linux_amd64 | cut -d '"' -f 4 | wget -i -
ls
Now, after ls the command will show the latest version of lego, similar to the one below.
lego_vX.Y.Z_linux_amd64.tar.gzNow you have to copy the file version name and execute the following command to install the latest version of lego one by one. Please keep
tar xf lego_vX.Y.Z_linux_amd64.tar.gz
sudo mkdir -p /opt/bitnami/letsencrypt
sudo mv lego /opt/bitnami/letsencrypt/lego
Now we’ve successfully installed lego into the Bitnami stack. Now it’s time to install an SSL certificate for your website.
sudo /opt/bitnami/ctlscript.sh stop nginx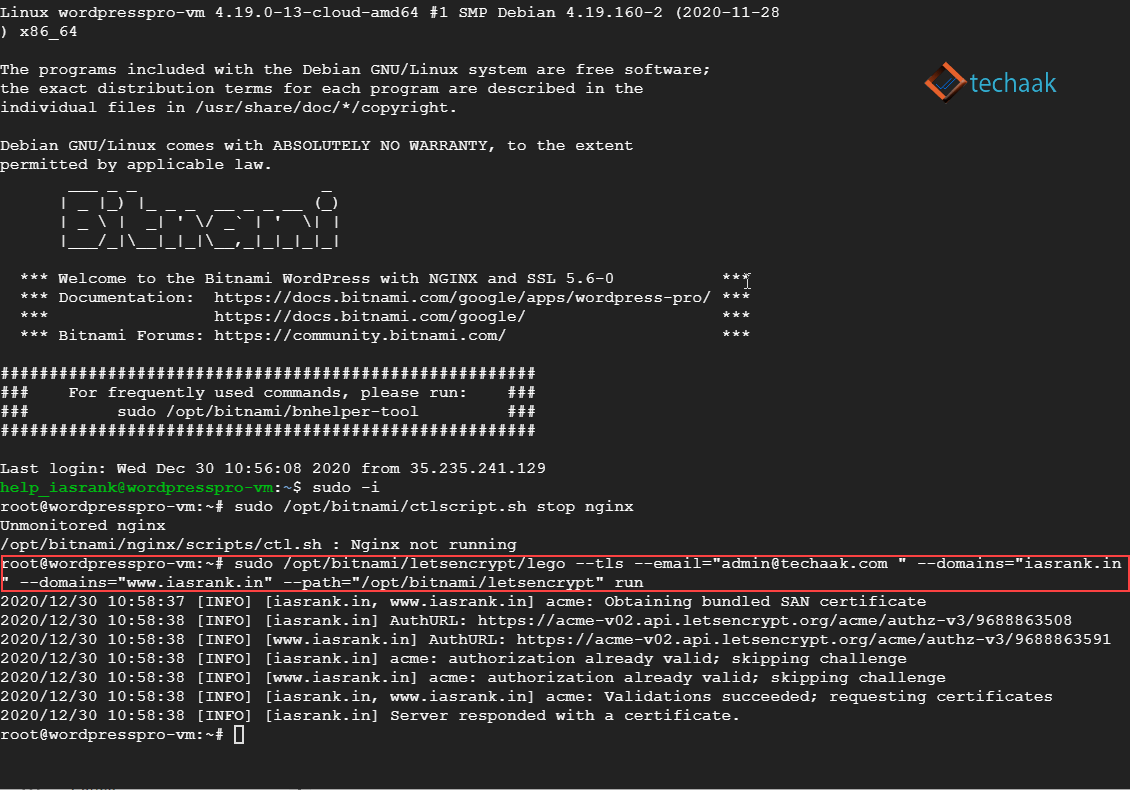
Generate SSL Certificate Bitnami nginx
Now generate a renewable SSL certificate for your website by executing the following.
sudo /opt/bitnami/letsencrypt/lego --tls --email="youremail@gmail.com " --domains="iasrank.in" --domains="www.iasrank.in" --path="/opt/bitnami/letsencrypt" runIn the above command, please replace email and domain names with your own values.
Lego will successfully generate an SSL certificate for your blog. Now you’ve to configure your blog to serve using this SSL certificate.
Start NGINX server of WordPress.
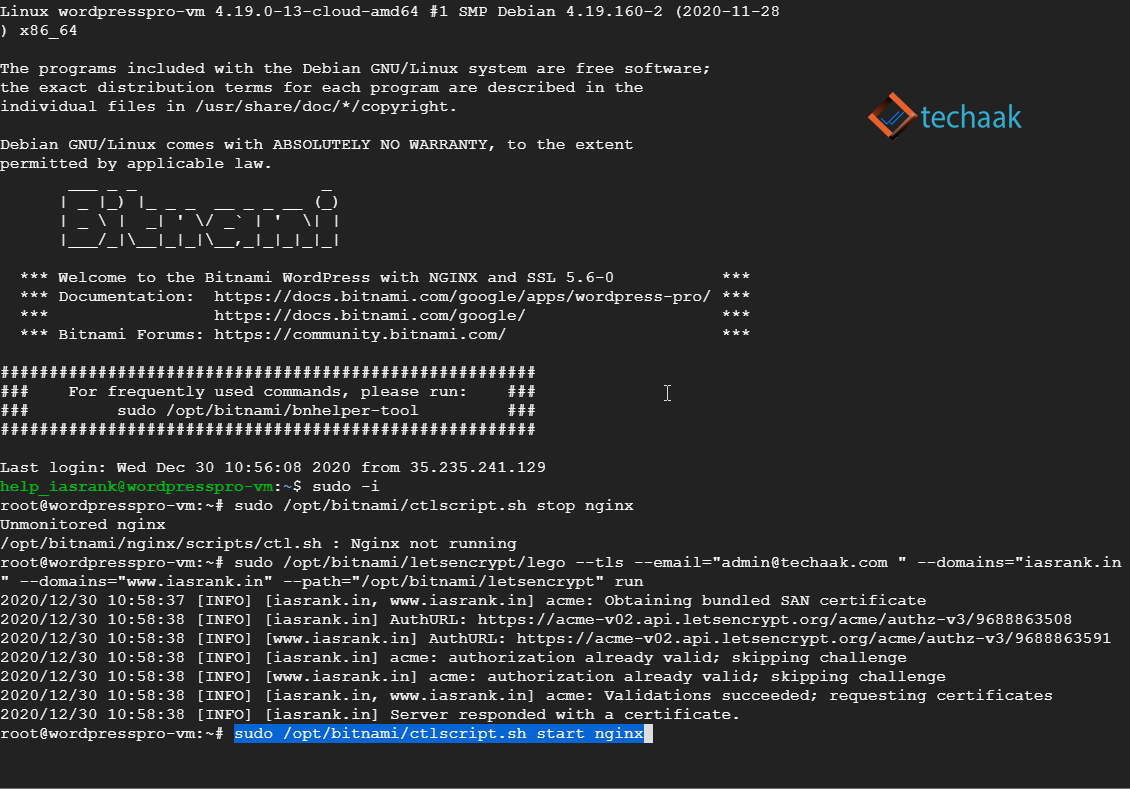
Start Bitnami NGINX
Your Nginx server is turned off during the certificate generation. To turn it on, execute the following command for bitnami NGINX.
sudo /opt/bitnami/ctlscript.sh start nginxConfigure Bitnami WordPress stack for SSL certificate
It’s time to configure your SSL certificate with the root of the WordPress application. This will enable nginx to find the certificate and redirect your domain to one preferred URL.
To provide a path to the nginx server, we’ve to edit bitnami.conf file of the stack. Execute the following command line. This will redirect bitnami WordPress redirect HTTP to HTTPS nginx.
nano /opt/bitnami/nginx/conf/server_blocks/wordpress-https-server-block.conf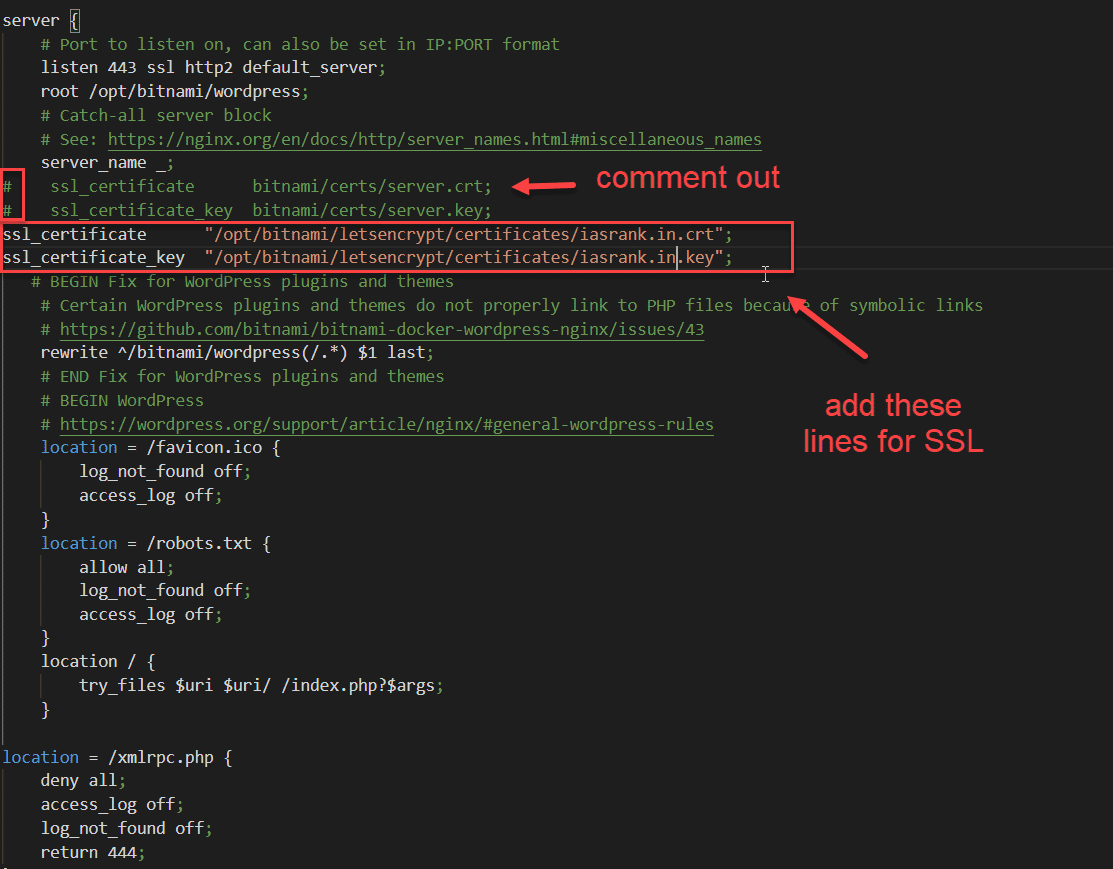
Bitnami configuration
Change iasrank.in with the www or non-www version of your website. That means Bitnami WordPress will redirect HTTP to HTTPS nginx. Now we point all traffic to one naked domain(in our case). And provide a path for the SSL certificate. Edit server 443 and add the following lines.
ssl_certificate      "/opt/bitnami/letsencrypt/certificates/iasrank.in.crt";
ssl_certificate_key  "/opt/bitnami/letsencrypt/certificates/iasrank.in.key";
## ssl_certificate server.crt;
## ssl_certificate_key server.key;You’ve to Comment Out the previous SSL certificate file by adding # before the line displayed in the image. Now SSL certificate has been installed on your WordPress website.
All done, save the file using ctrl+X, then Y, and press Enter button to confirm the changes.
Configure WordPress for SSL certificate.
You can configure WordPress by editing the wp-config.php file. To do that, execute the code provided below.
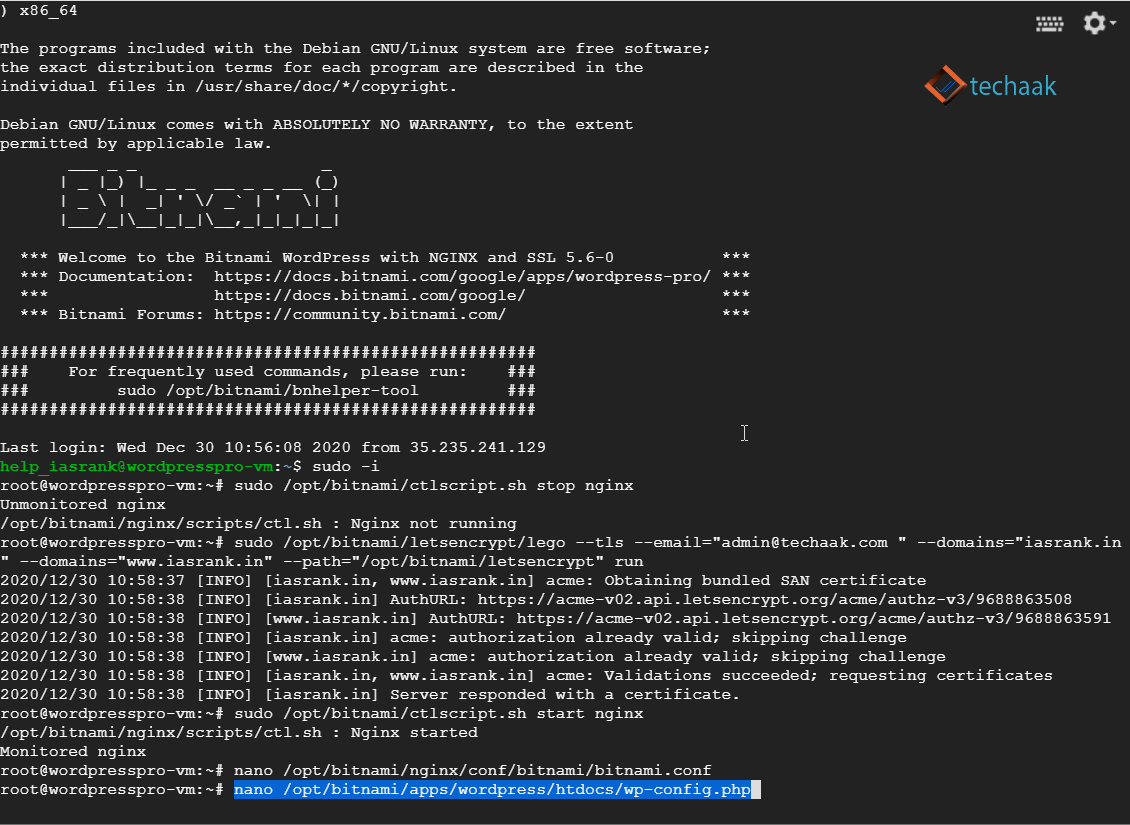
Edit wp-config.php NGINX WordPress bitnami
nano /opt/bitnami/wordpress/wp-config.phpThis will open the wp-config.php file to the SSH editor.
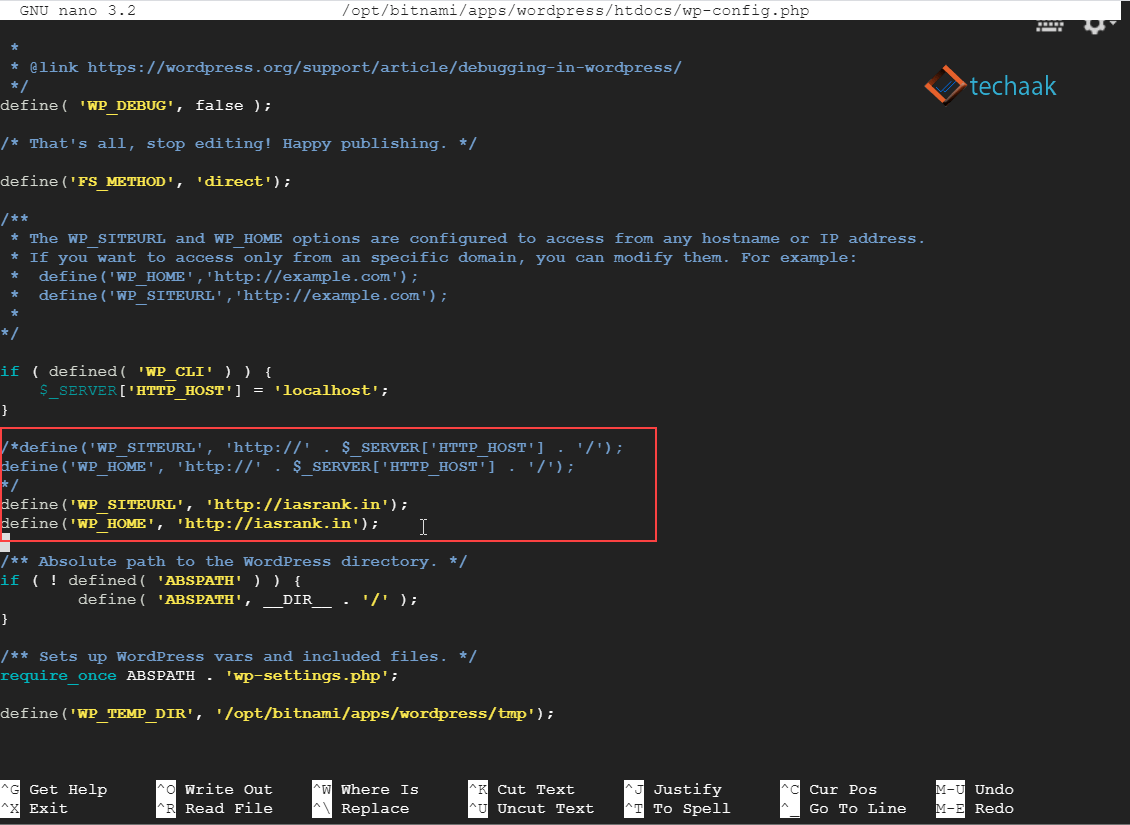
Now replace HTTP to HTTPS for your WordPress domain
define('WP_SITEURL', 'http://iasrank.in');
define('WP_HOME', 'http://iasrank.in');

replace with

define('WP_SITEURL', 'https://iasrank.in');
define('WP_HOME', 'https://iasrank.in');
Now press ctrl+X, then Y, and press Enter to save the changes.
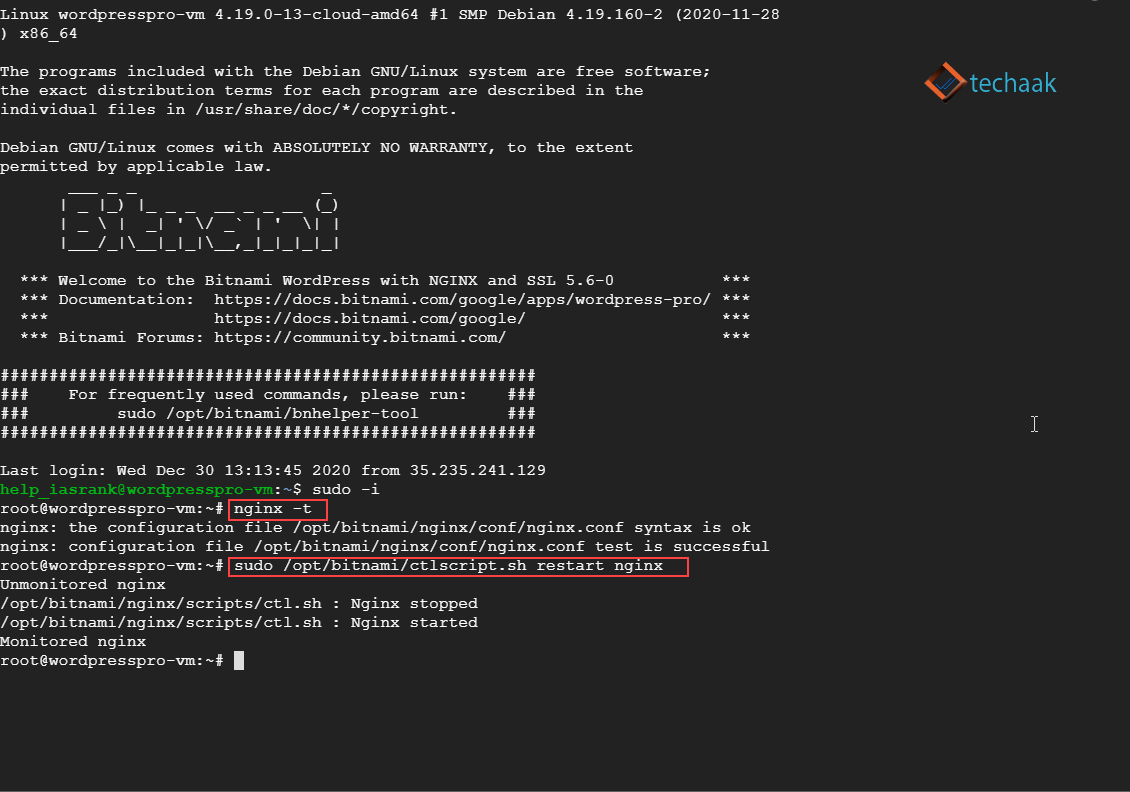
Test and Restart Bitnami NGINX
Now in the final step, you’ve to test and restart NGINX. Execute nginx -t to test NGINX and restart. Please match the configuration result if any error occurs in the nginx configuration.
nginx -t
sudo /opt/bitnami/ctlscript.sh restart nginx
Now all done, your Bintami WordPress now runs on HTTPS secure server with a Let’s Encrypt SSL certificate. You can ask in the comment section below if you’ve any questions regarding this.
JOIN THE CONVERSATION
Comments
Have a question or something to add? Comments are moderated and appear here only after approval.
JavaScript is required to submit a comment. Published comments above remain available to read.
11 published comments, including 2 replies. Threads shown oldest first.
In reply to Tommy
In reply to Tommy