
TheContact Uspage is an essential part of any blog or website. It allows visitors to reach out directly with queries, feedback, partnership requests, or other messages. For Blogger users, creating a functional and professional Contact Us page can significantly improve communication and reader engagement.

Contact us form for a Blogger blog.
Why You Need a Contact Us Page on Your Blogger Blog
- Protects your email from spam bots— Using a form hides your email address from bots that scrape websites for spam targets.
- Builds trust and credibility— Visitors feel confident reaching out when you offer an official contact channel.
- Improves user experience— Readers can easily share feedback, report issues, or ask questions.
Overview: Contact Form in Blogger.
Blogger offers aContact Form widgetthat can be added to sidebars or footers via the Layout panel. While this method is quick, the widget appears on every page and doesn’t look very polished. For a more professional and dedicated Contact Us page, you’ll create a separate page with a customized contact form.
Step 1: Create a Dedicated Contact Us Page with a Form
Use the HTML code below to create a static, well-designed contact form. The form will collect essential info—name, email, and message—from your visitors.
Here, we are providing HTML code for the Contact Us page for the Blogger blog. The below HTML will create a static form with a good design. To make the form functional, follow this guide till the end.
<h2>We'll happy to help you, fill form given below to contact with us.</h2>
<p>We'll like to hear from you. It feels good when you send message to us. If any issue related to broken link of any document or book. We updated link of books/newspaper that are already on internet .. If any issue related to books copyright then please mail us on Email admin@iascgl.com</p>
<div style="text-align: center;">
    <p>Thanks And Regards iascgl.com Team admin@iascgl.com Delhi India</p>
</div>
<div style="text-align: center;color: green;">
    You can reach us by filling this form
</div>
<div class="contact-form-widget">
    <div class="form">
        <form name="contact-form">
            <p></p>
            Name
            <br />
            <input class="contact-form-name" id="ContactForm1_contact-form-name" name="name" size="30" type="text" value="" />
            <p></p>
            Email
            <span style="font-weight: bolder;">*</span>
            <br />
            <input class="contact-form-email" id="ContactForm1_contact-form-email" name="email" size="30" type="email" value="" />
            <p></p>
            Message
            <span style="font-weight: bolder;">*</span>
            <br />
            <textarea class="contact-form-email-message" cols="25" id="ContactForm1_contact-form-email-message" name="email-message" rows="5"></textarea>
            <p></p>
            <input class="contact-form-button contact-form-button-submit" id="ContactForm1_contact-form-submit" type="button" value="Send" />
            <p></p>
            <div style="max-width: 222px; text-align: center; width: 100%;">
                <p class="contact-form-error-message" id="ContactForm1_contact-form-error-message"></p>
                <p class="contact-form-success-message" id="ContactForm1_contact-form-success-message"></p>
            </div>
        </form>
    </div>
</div>
How to use:
- Create a new page in your Blogger dashboard, switch to HTML mode, paste this code, and publish it.
- This creates a static form layout. The form itself will need functionality added, as explained below.
Step 2: Add the Blogger Contact Form Widget for Functionality
Blogger uses a backendContact Form widgetto make forms functional. Since Blogger added session security, the contact form can only work via this widget.
How to add the widget:
- Go toBlogger Dashboard > Layout.
- ClickAdd a Gadgetin the sidebar or footer section.
- SelectContact Formfrom the pop-up and add it.
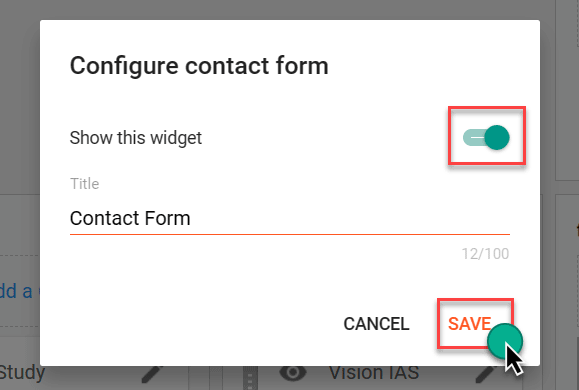
- Save the layout.
Note: This widget is visible on all pages by default.
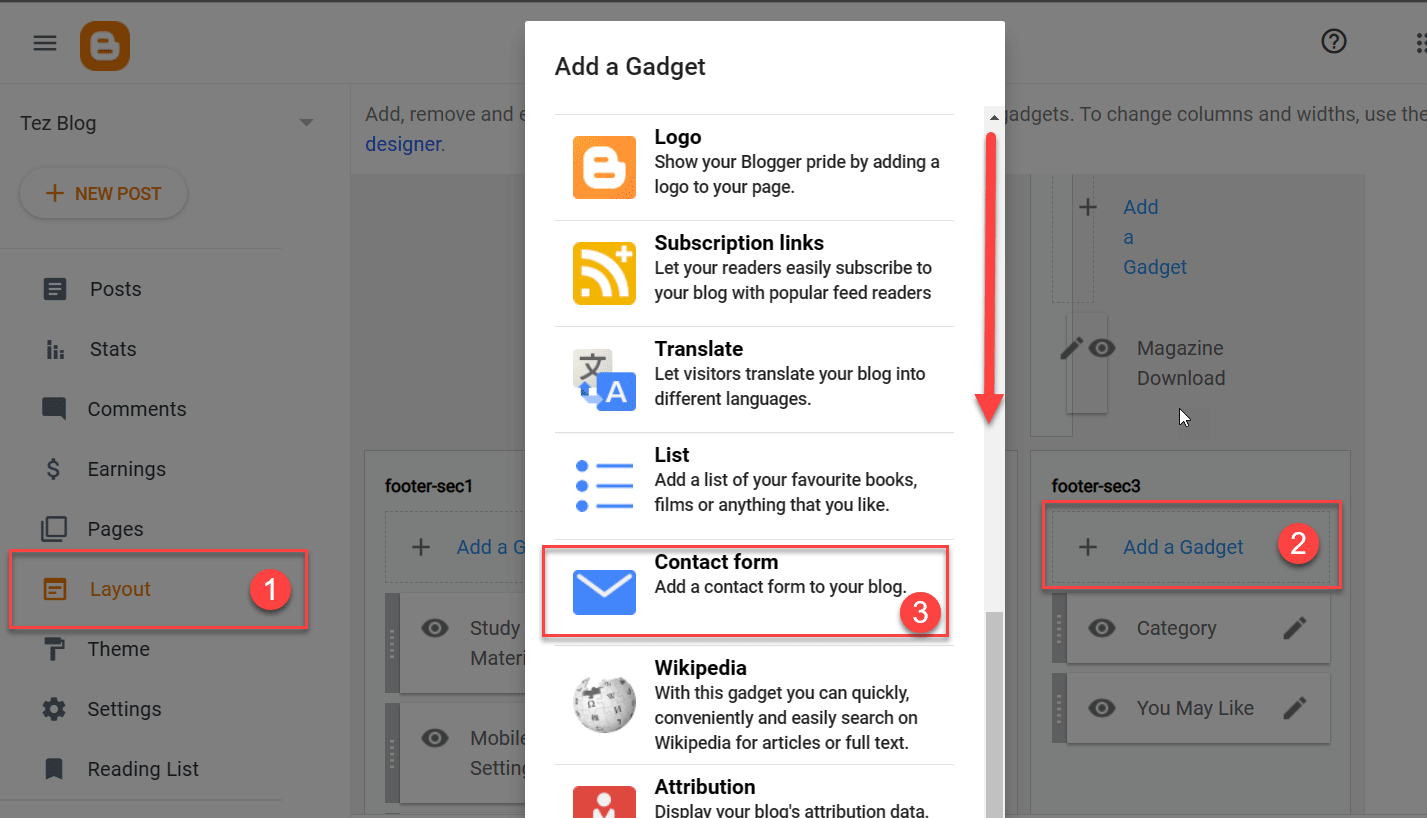
This will add a contact form to the sidebar of every blog page. But we don’t want our Contact form widget visible on all pages of the website. To remove the form, we’ve to tweak the theme file.
Step 3: Show the Contact Form Only on the Contact Us Page
To hide the contact form on all pages except your Contact Us page:
- Go toTheme > Customize > Advanced > Add CSSor edit your theme’s HTML directly.
- Add the following CSS before the
</head>tag:
And to edit the Blogger theme, visit Theme>Customize>Edit HTML. Add the following code before the </head> tag.
<style>
#ContactForm1{display:none;}
</style>
This CSS hides the widget everywhere except on your Contact page, where it becomes visible.
Important Notes:
- **JavaScript & CSS:**If you disabled default Blogger JavaScript or CSS, the contact form may not work. Ensure no critical scripts/styles are disabled.
- Do NOT edit the
</body>tagimproperly, as it can break the form. - Emails sent through the form will go to the email connected to your Blogger account.
Step 4: Testing Your Contact Form
- Open your Contact Us page on the live blog.
- Fill in the form fields and send a test message.
- Check your Gmail inbox (including Spam folder) linked to Blogger for the email.
Create a Blogger Page
To paste the above script, you must enable the HTML mode on the page.
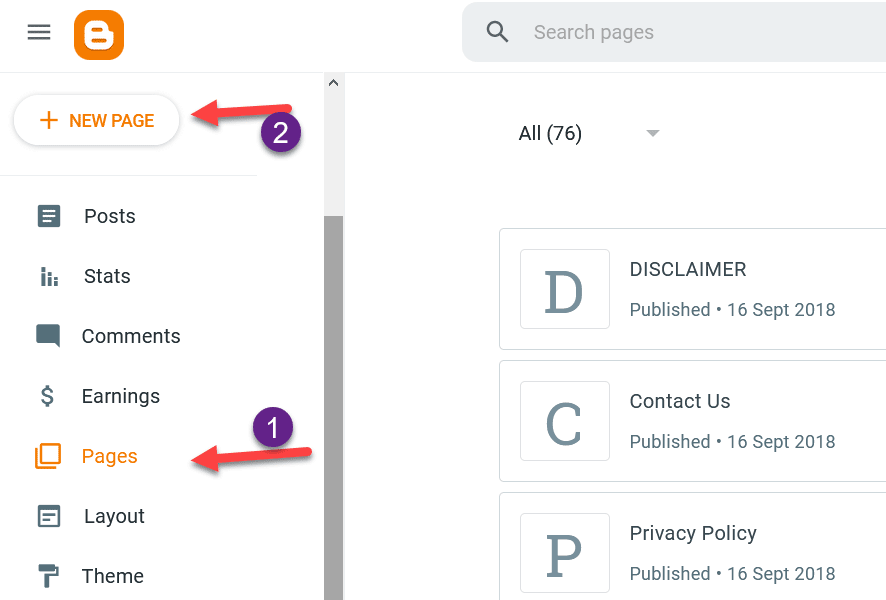
Create A New Page in Blogger
- Visit Blogger Dashboard, Click on Pages
- Now Click on Create New Page.
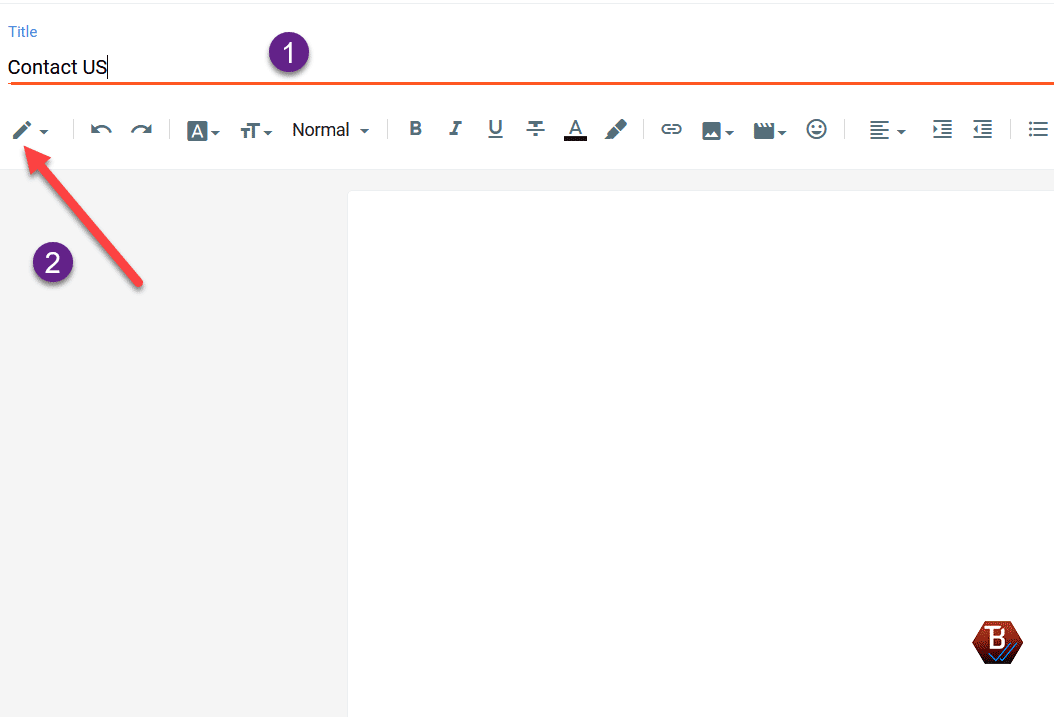
Blogger Page Edit HTML Page
- Enter the Title of the Contact Us page.
- Click on the edit (pencil symbol) to switch to HTML mode.
- Paste the code generated using the above button and publish.
You can now try sending the email address. You’ll receive all emails at the email address linked to Blogger.
Working? You can appreciate our work with your comment below.
Blogger Contact Us Page Not Working? Try This.
If Contact Us doesn’t work, you should check that you are not tweaking the </body> tag. Also, check your Gmail spam folder for the email.
This Contact Us form will work with custom domain names and the subdomain blogspot.com domain.
Final Words
Creating adedicated Contact Us pagewith a hidden-but-functional contact form widget improves your Blogger blog’s professionalism and user engagement. Follow the steps above to craft a clean, trustworthy contact channel that helps you build meaningful connections with your audience.
If you want to give your blog a premium look, check out ourBloggerMagor**Oyedad Premium Themes**— these SEO-friendly themes also come with built-in layouts for contact pages and enhanced customization.
Please feel free to ask if you want me to help you with implementing any code snippets or customizing the design!
JOIN THE CONVERSATION
Comments
Have a question or something to add? Comments are moderated and appear here only after approval.
JavaScript is required to submit a comment. Published comments above remain available to read.
74 published comments, including 10 replies. Threads shown oldest first.
In reply to amanda
In reply to amanda
In reply to Ashok Sihmar
In reply to amanda
In reply to Sunil
In reply to Jonell Lucagbo
In reply to Seth Boamah
In reply to Tajudin
In reply to Ajmal
In reply to Ajmal