Set up high-speed WordPress website on Google Cloud Platform using Bitnami Apache server. In this tutorial, we’ll cover the complete setup of WordPress Deployment.
You can also install the Bitnami WordPress NGINX with SSL or follow this guide for the Apache server. Learn the difference between NGINX and Apache.
Deploy WordPress using Bitnami Apache stack on Google Cloud
Overview: First, we’ll deploy WordPress, then configure the domain name for the CMS. After that, we’ll install the SSL certificate (in the next tutorial). We’ll also learn how to increase the upload size limit.

Apache and NGINX(Engine-X) are two high-speed website servers. We’re installing WordPress CMS using Bitnami Apache. If you want to set up multiple domains on a single server, NGINX should be preferred.
Bitnami Apache stack can be located here in the Marketplace of Google Cloud Platform. Or you can search Bitnami WordPress Apache.

Now click on the launch button to deploy the WordPress CMS. It will take a few seconds, and you’ll redirect to a new screen to customize the virtual machine.
This virtual machine will handle the Bitnami WordPress project on Google Cloud. Configure it as per your need.

You can check the stack’s operating system and software on the right side of the deployment dashboard. It will also display a round-off monthly cost for the project, just above the stack information.
- Enter a name for your WordPress CMS.
- The location where you want to set up your project.
- Name and power of the processor, RAM.
- Type of storage you want to use in the project.
- Size of the Boot disk in GigaByte.
- Network configuration, leave it default.
- Setting for HTTP and HTTPS traffic.
- Deploy the WordPress CMS.
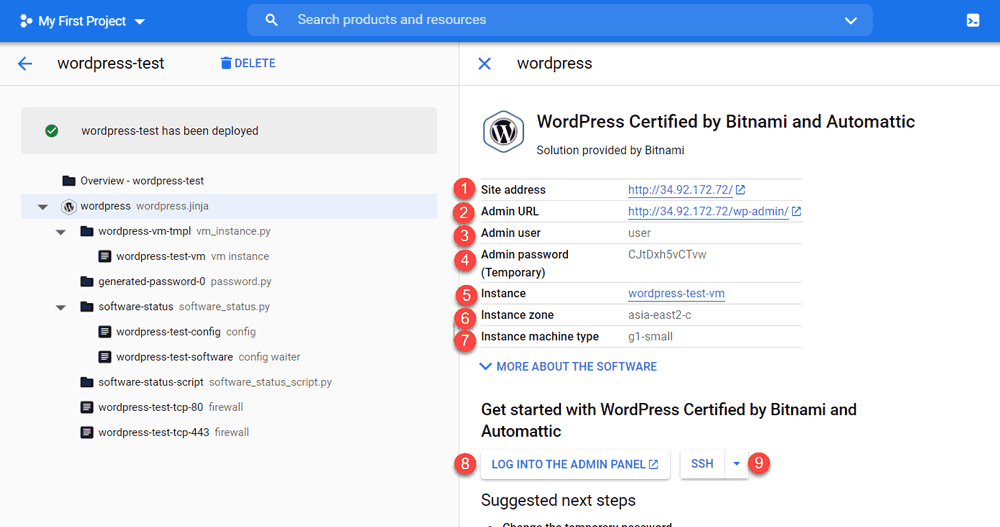
Now it will take a few minutes to deploy your Bitnami WordPress project on Google Cloud. After a successful deployment, you’ll see the system configuration as displayed below.

Let’s understand what these all configurations are.
- This is the WordPress website address.
- Address to login into WordPress.
- Username for login.
- Password for login. Please note that this password will also use for login into the PHPMyAdmin.
- Virtual Machine Name.
- The server location of the project.
- Name of Virtual Machine.
- Login button for WordPress.
- Access SSH terminal of the stack(VM).
Reserve an External IP Address
Your WordPress application is now live. But you can access it using the IP address only. We’ve to set up a domain name for your Bitnami WordPress Apache project on Google Cloud.
But before setting up a domain name, we’ve to reserve a static external IP Address. For this, please read our article How to Reserve static IP Address.
Configure a custom Domain Name for WordPress Bitnami on Google Cloud.
To configure a custom domain name, you’ve to point the DNS IP Address to VM. That means point A records to the External IP Address of your project.
After that, you’ve to edit the wp-config.php file of your WordPress stack and provide an address to it. Learn how to set up a domain name for Bitnami WordPress.
Now the installation of WordPress Bitnami on Google Cloud is successful. There will be a logo of Bitnami in the right footer corner of WordPress CMS. Learn how to remove the Bitnami banner from WordPress. We’ll soon post a new article on SSL installation.
If you like this article or any queries, please ask in the comment section provided below.