If you want to install multiple WordPress websites or blogs on a single Virtual Machine (VM), this article is for you. This tutorial is for WordPress with NGINX and SSL Certified by Bitnami and Automattic on the Google Cloud.
This will guide you on how you can install multiple different WordPress, not multisite. This Bitnami stack includes a single WordPress in its image file, and we’re adding a second WordPress. You can find the installation of the Bitnami WordPress NGINX application here. This article guides how you can install a second WordPress application on the virtual machine, and you can follow the same method to add more WordPress CMS.
Installation of Multiple WordPress using a Single Virtual Machine VM Bitnami NGINX
After successfully installing the WordPress NGINX Bitnami stack, you can follow this step of adding multiple WordPress applications to your Bitnami stack. But the question may arise that.
Why should one install multiple WordPress on a single VM?
You might already know the answer as you’re already here. However, these are some major points that could be the reason.
- Handling Multiple VM may complicate the task.
- If you’ve already a virtual machine, why create so many? It will save hard-earned money and resources.
- From the above line, you can understand usage costs could be very high for different VM. We can save our hard-earned money using a single virtual machine,
- This may allow you to choose a robust, dedicated virtual machine instead of multiple small shared machines.
- Drawback: It could be that you can’t install one WordPress in India and one in the US region. But both WordPress will work fine globally.
Add database for the Second WordPress using phpMyAdmin.
In the Bitnami stack, PHPMyAdmin is very secure, and you can’t access it directly by visiting a URL. Learn how to connect PHPMyAdmin in the Bitnami stack.

After login into phpMyAdmin, you’ve to create the database for your new WordPress application.
- In the phpMyAdmin dashboard, click on new to create a new database,
- Please enter the name of the database. In this tutorial, we’re creating a database with the name seoneurons.
- Press the create button, and done.
We’ve created a new database with the name “seoneurons,” and now let’s install WordPress into the directory.
Add MultiPress WordPress to create files in the VM.
First, you’ve to open the SSH Terminal; if you don’t know how to do it, please refer to this SSH tutorial. And you’ve to download the WordPress application to the Bitnami application folder.
To do that, you’ve to access SSH with root permission,
sudo -iDownload New WordPress Application to the application folder
First, we’ll go to the application folder, and execute the command line.
cd /opt/bitnami/
mkdir apps
cd apps
Now Create a New folder in this directory. We are creating a new folder with the name “seoneurons”. You can choose any name, but you’ve to change seoneurons with your folder name in the following command.
Download the WordPress zip and extract
Execute the following commands one by one. Please note you can change the red color value, but you must change the values given in blue color.
mkdir seoneurons
cd seoneurons
wget http://wordpress.org/latest.tar.gz
tar xfz latest.tar.gz
mv wordpress htdocs
Now we downloaded the latest WordPress application to the virtual machine. To run multiple WordPress, we’ve to connect this WordPress to the single virtual machine’s present environment. To do that, let’s create configuration files.
Configuration files for the New WordPress Application.
We’ll create the configuration folder with the name “conf” for our new WordPress Application. To do that execute these commands one by one.
cd /opt/bitnami/apps/
mkdir conf
cd conf
nano nginx-app.conf
Now a blank window or new file window is opened up to create an nginx-app.conf configuration file. You’ve to paste the following lines in that.
index index.php index.html index.htm;

if ($request_uri !~ "^/phpmyadmin.*$")
{
  set $test  A;
}
if ($request_uri !~ "^/bitnami.*$")
{
  set $test  "${test}B";
}
if (!-e $request_filename)
{
  set $test  "${test}C";
}
if ($test = ABC) {
  rewrite ^/(.+)$ /index.php?q=$1 last;
}

# Deny access to any files with a .php extension in the uploads directory
location ~* /(?:uploads|files)/.*\.php$ {
  deny all;
}

# Disable logging for not found files and access log for the favicon and robots

# Deny all attempts to access hidden files such as .htaccess or .htpasswd.
location ~ /\. {
    deny all;
}

location ~ \.php$ {
    fastcgi_split_path_info ^(.+\.php)(/.+)$;
    fastcgi_read_timeout 300;
    fastcgi_pass unix:/opt/bitnami/php/var/run/www.sock;
    fastcgi_index index.php;
    fastcgi_param  SCRIPT_FILENAME $request_filename;
    include fastcgi_params;
}
Press ctrl+x(windows) or cmd+x(mac), Then Y to confirm the changes, and then press the enter button to update the changes.
Now We’ll create a second configuration file nginx-prefix.conf.
nano seoneurons-prefix.confIn the new blank window, paste these lines.
location /seoneurons {
alias "/opt/bitnami/apps/seoneurons/htdocs";
include "/opt/bitnami/apps/conf/nginx-app.conf";
}
Now save this file by pressing Ctrl+X, then Y, and then enter. Now we’ll create the host file. Execute the following command.
nano seoneurons-vhosts.confA new blank window will open up. Paste the following code to replace it with your values(red letters).
server {

    listen    80;
    root   "/opt/bitnami/apps/seoneurons/htdocs";
    server_name  seoneurons.com www.seoneurons.com;

    include "/opt/bitnami/apps/seoneurons/conf/nginx-app.conf";
}

server {

    listen    443 ssl http2;
    root   "/opt/bitnami/apps/seoneurons/htdocs";
    server_name  seoneurons.com www.seoneurons.com;

      ssl_certificate      /opt/bitnami/nginx/conf/bitnami/certs/server.crt;
       ssl_certificate_key  /opt/bitnami/nginx/conf/bitnami/certs/server.key;

       ssl_session_cache    shared:SSL:1m;
       ssl_session_timeout  5m;

    ssl_ciphers  HIGH:!aNULL:!MD5;
    ssl_prefer_server_ciphers  on;

#change this folder name
    include "/opt/bitnami/apps/seoneurons/conf/nginx-app.conf";
}
Replace seoneurons.com with your domain name and add http2 in a secure server block to serve data through HTTP/2 technology.
Save the changes by pressing ctrl+x, then Y, and then enter.
Now all the configuration of your WordPress environment is done but not of Bitnami nginx stack.
Connect the configuration with the bitnami stack
Now you’ve to make some changes in the Bitnami stack here. Execute the following command to do that.
cd /opt/bitnami/nginx/conf/server_blocks
nano wordpress-https-server-block.conf
Now a new SSH window will open up. Add the following lines inside the server block and outside the server block, respectively. The line inside the server block will be
include "/opt/bitnami/apps/conf/*-prefix.conf";Place this line outside the server block. You’ve to add these lines once only to enable multiple WordPress websites.
include "/opt/bitnami/apps/conf/*-vhosts.conf";After adding these configuration files, the block will look like
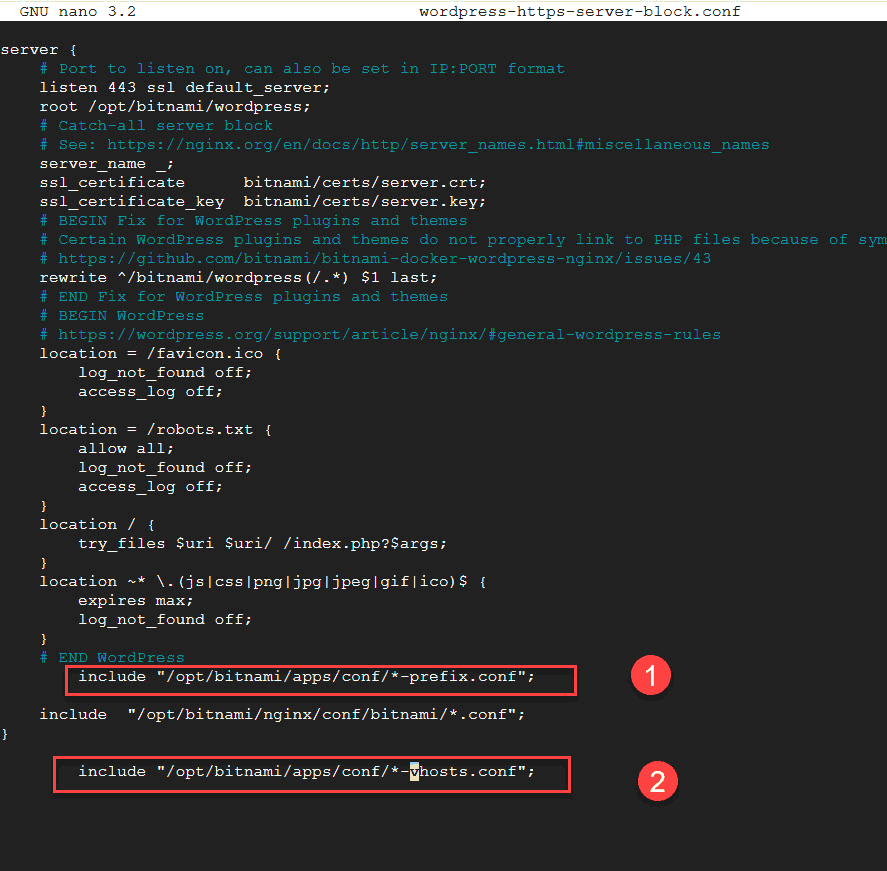
Save the change by pressing Ctrl+X, then Y, and then press enter. Your changes will be saved.
Now all done for the Multiple WordPress on Single Virtual Machine. The new WordPress is connected with the existing Bitnami WordPress application.
Check that all settings are correct by executing.
nginx -tIf it responds as ok, then fine, or in case of any error, check all steps you performed.
Set the default public permissions to the new WordPress application.
sudo chown bitnami:daemon -R /opt/bitnami/apps/seoneurons/htdocs/*
sudo chmod -R g+w /opt/bitnami/apps/seoneurons/htdocs*
Now restart the nginx, and execute the following command.
sudo /opt/bitnami/ctlscript.sh restart nginxUpdate DNS of New WordPress
Visit the domain name provider’s account and point the single virtual machine’s IP to your domain name. Check Domain Name Configuration.
Access the New WordPress
You can now access your new WordPress website(of course, after the DNS update).
- Provide the database name. In our case, it was seoneurons
- The password for the database is the same as the phpMyAdmin login page.
SSL certificate configuration of new WordPress Application
When you create multiple WordPress in a Single Virtual Machine, you need to set up a separate SSL certificate. You’ve to provide the path of this SSL certificate in nginx-vhost.conf instead of Bitnami.
Generate a new SSL certificate, and execute the commands one by one.
In the latest release, 7.2 of WordPress NGINX SSL, the lego module is not included. So first of all, we’ve to include the lego module. To install the lego module, execute the following command one by one.
cd /tmp
curl -Ls https://api.github.com/repos/xenolf/lego/releases/latest | grep browser_download_url | grep linux_amd64 | cut -d '"' -f 4 | wget -i -
tar xf lego_vX.Y.Z_linux_amd64.tar.gz
sudo mkdir -p /opt/bitnami/letsencrypt
sudo mv lego /opt/bitnami/letsencrypt/lego
Now let’s generate the SSL certificate for our new WordPress website.
sudo /opt/bitnami/ctlscript.sh stop nginx
sudo /opt/bitnami/letsencrypt/lego --tls --email="admin@seoneurons.com " --domains="seoneurons.com" --domains="www.seoneurons.com" --path="/opt/bitnami/letsencrypt" run
sudo /opt/bitnami/ctlscript.sh start nginx
Please change the email address and domain name values with your values.
Now point the new SSL certificate to the latest WordPress install. Execute the following command.
nano /opt/bitnami/apps/conf/seoneurons-vhosts.confNow add the new certificates and comment out old, new nginx-vhosts.conf file would look like.
server {

    listen    80;
    root   "/opt/bitnami/apps/seoneurons/htdocs";
    server_name  seoneurons.com www.seoneurons.com;

    include "/opt/bitnami/apps/conf/nginx-app.conf";
}

server {

    listen    443 ssl;
    root   "/opt/bitnami/apps/seoneurons/htdocs";
    server_name  seoneurons.com www.seoneurons.com;


# no need to change SSL certificate path.
#    ssl_certificate "/opt/bitnami/apps/wordpress/conf/certs/server.crt";
 #   ssl_certificate_key "/opt/bitnami/apps/wordpress/conf/certs/server.key";

# new certificate below the line.
ssl_certificate "/opt/bitnami/letsencrypt/certificates/seoneurons.com.crt";
ssl_certificate_key  "/opt/bitnami/letsencrypt/certificates/seoneurons.com.key";

       ssl_session_cache    shared:SSL:1m;
       ssl_session_timeout  5m;

    ssl_ciphers  HIGH:!aNULL:!MD5;
    ssl_prefer_server_ciphers  on;

#change this folder name
    include "/opt/bitnami/apps/conf/nginx-app.conf";
}
Now test the nginx configuration, execute
nginx -tAfter successful verification, reload the new changes we made to the application.
nginx -s reloadAnd you did it! Your new WordPress application can be accessed through the URL you provided. You can learn how you can install the WordPress NGINX Bitnami stack here.
Big thanks for the article, Ashok!
—
# Deny all attempts to access hidden files such as .htaccess or .htpasswd.
location ~ /\. {
deny all;
}
—
– that directive blocks .well-known for letsencrypt http challenge, thus automatic prolongation of SSL certificates won’t work with -http, and -tls works only when nginx is stopped – not a good idea for a working website.
I’ve changed it to
location ~ /\.(htaccess|htpasswd) {
deny all;
}
and letsencrypt http challenge works now with no probs now.
Hope that may help someone.