A business Email Address provides a brand identity to your website or blog. You can choose any alias for your business name, like admin@example.com, for a domain owner of example.com. This article discusses how to create free Business email addresses using Gmail.
To create a free business email address, you must own a domain name, and if you don’t have one, you can buy it from Namecheap or other domain name providers that provide email forwarding services with the domain name. But if you already have one, follow this guide.
Is it possible to create a free business email address?
The answer to this question is yes. You can create a free business email using the hosting provider or only the domain name. This article will discuss free methods to create email for your business using Gmail or hosting.
If you create a business email using the hosting provider, all the email’s control is on you. You can decide the total storage of the email account and the size of attachments, which means you are the email provider and can enjoy all the premium services of the business email address.
When you create a free business email on Gmail using the domain name only, there are serval limits attachment can’t be larger than 20MB, the total storage limit is 15GB.
We can create free Business email addresses using Gmail and cPanel. Let’s understand them one by one.
You can also create a Zoho account. Zoho allows you to create up to 5 Business email addresses for free. But there are some limitations like storage limitations, synchronous, etc.
How to Create a Free Business email address using cPanel
You can also create a business email address using the cPanel from a WordPress website hosting provider. This is the most common and easy method for beginners. The cPanel of the hosting provider will allow you to create a number of email addresses as per your need. You can create professional email addresses for your employees.
Get a Free email address with a hosting provider like Bluehost.
Bluehost is the recommended hosting provider in the list of WordPress for WordPress hosting. You have to purchase a hosting plan as per your website’s traffic.
If you already own a brand, check the availability of a domain name for your brand using the following search bar.
We recommend creating a domain name the same as your brand. It will help your customers to remember your domain and business. If the domain name is not available with .com, you can go with the ccTLD or country code top-level domain. Learn how to find the best domain name for your website or blog.
Bluehost provides you with a free business email address with its hosting. You can also create your website using Hostinger which provides free hPanel to create a business email.
Create Business Email using cPanel
After purchasing the hosting, you can log in to the cPanel of the hosting provider and create a custom email address with the domain name.

After creating the business email address, you can access it using webmail.seoneurons.com, where seoneurons is your domain name. This service is with hosting and will not charge you extra.
Enable Email Forwarding Service.
Suppose you run a website where you don’t need any hosting service or have not chosen the right WordPress hosting. As some hosting provider doesn’t give access to cPanel, you can only access file manager, so you can’t create a free custom Business email. In such a case, you can buy an email service package or create a free business email using a domain name or use Gmail for business for free.
To create a free Business email on Gmail, you need an email forwarding service from the Domain Name Provider.
NameCheap, Cloudflare, or Google domain provides excellent email forwarding services. Bluehost and Bigrock offer you two free business email addresses with the domain.
But if you purchased a domain that doesn’t include a free email service or email forward service like Godaddy. You can configure your domain on Cloudflare for email forward service.
Create Email Forwarding using Cloudflare.
This will allow you to receive your business emails on your personal Gmail account.
Some domain name providers do not provide an email forwarding feature; in that case, you can use Cloudflare to forward all emails to receive on your business domain.
You have to create a Cloudflare account to enable the email forwarding service.
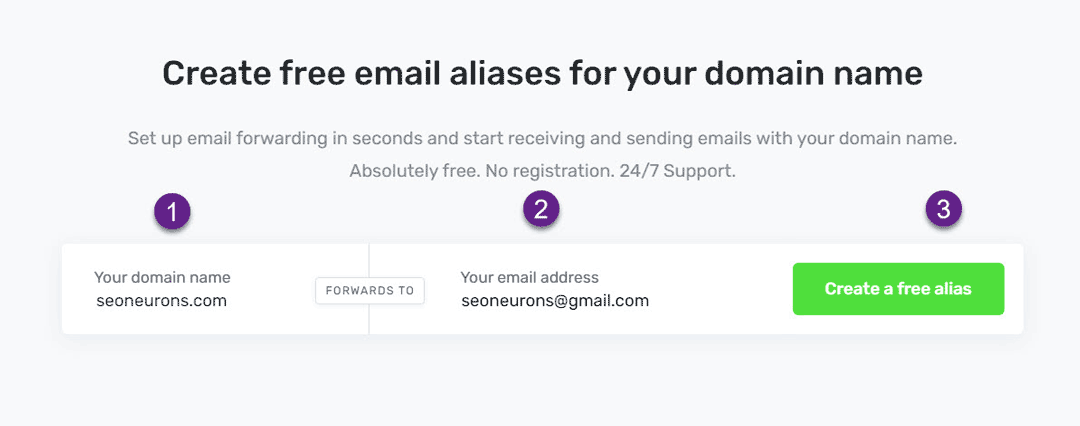
- Enter the Domain Name for which you want to create a business email address.
- Enter the current Gmail address to receive all the forwarded emails.
- Click on create free alias.
This will send a verification email to your Gmail account. You’ve to check the email and verify.

After successful email verification, you can provide the business email address in the Aliases section. When someone sends an email to this address, it will get in your Gmail email box. That’s your business email address, so now your users can send emails to this address, and you’ll receive these emails in your Gmail email box.
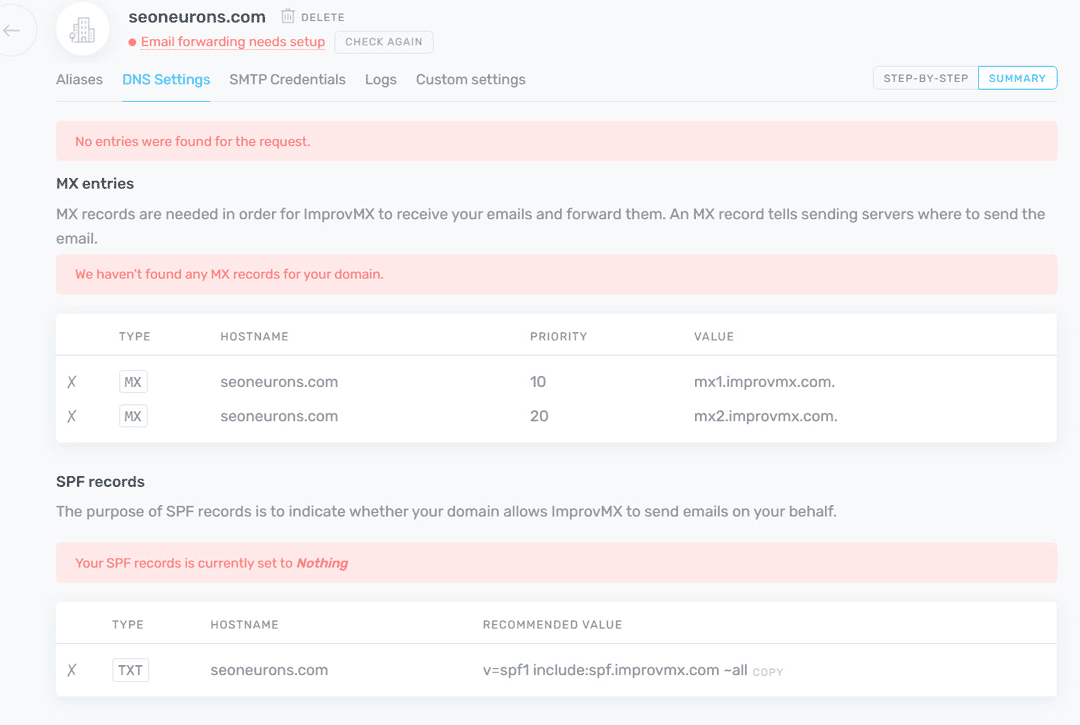
After verifying the domain name, you’ve to verify and set up the domain for email forwarding. The ImprovMX will ask you to update DNS records. Please note that if you pointed the nameserver to Cloudflare, you’ve to change the record in Cloudflare.
After updating the DNS record, you’ve to wait for its propagation. It may take a few minutes to a few hours. Check this propagation at digwebinterface.com. After the DNS update, you can receive all the emails to your Business email address.
Forward Email in NameCheap Domain Provider.
Domain Registrar Namecheap allows you to forward emails to your email account. So you can follow this guide if you register your domain with Namecheap hosting provider.
You have to log in to your Namecheap account and click on manage account to forward emails.

Then enable email forwarding, provide youras name, and your Gmaiforward yourwhere you want to receive all emails.

You can try sending emails to your business email and it should receive on your personal Gmail account.
Please note: This Namecheap service will work with default nameservers. You can check the detailed guide of email forwarding at Namecheap.
Send Email using Gmail from Professional Email Address.
In the above part, we understand how to receive business email addresses and access them in Gmail. We’ll see how we can reply to those emails from our business email address in this part.
Generate an app login password for Gmail
You’ve to generate an app login password to add the business email address in Gmail. This password allows you to send or reply to emails using a professional email address.

To generate an app password, you’ve to scroll to Google account settings. Click on your profile picture to open settings for Google account,
- Go to Manage your Google Account,
- Open Security tab,
- In the Signing into the Google section, click on app passwords.

- Select App as Mail,
- The system as Windows Computer,
- Generate a one-time password to log in using your app.
In the above window, you can see a 16 characters password generated. This password can be used in log in to Google Account. How to use guide also provided along with the password. Please don’t close this tab till the next step is complete.
Add Business Email in Gmail Account.
To send from the business email address using the Gmail account, you’ve to log in to the Gmail account. From the Gmail dashboard, click on settings>the see all the settings.

Now go to account and import and then scroll to send mail as(check image below). Click on add another email address.

As you click on add another email address, this will open the pop windows. You’ve to provide details as described below.

- Name of your business account. This name will visible be to the email receiver.
- Provide a business email address,
- Follow the next step to set SMTP server,
- We are using Gmail SMTP servers, so provide details of Gmail SMPT i.e. smtp.gmail.com.
- Enter your Gmails’ email address,
- Provide the 16 characters password we created in the last step.
- In the Next window, you’ve to enter the OTP you just received in your Gmail account.
- Enter the OTP confirmation code,
- Click on verify account.
Now, you can send emails using your business email address. But by default, you can reply from your email address. Change this to reply using the same email address where you received the email.
Visit Gmail Account Settings>Account and Import>Send mail as> Reply from the same address.

Now you can try sending emails using your business email address. You can receive emails that have attachment of less than 20 MB. If you like to deal with large files, this feature is not for you. In that case, you can buy Gsuit apps.
Final Words
This article explains how we can create a free Business email address in Gmail, and hosting cPanel. And also, it makes us utilize the email forwarding service provided along with the domain name. Google domains and NameCheap are best in this respect.
I hope you like this article. In case of any doubt, query, or feedback, feel free to ask in the comment section provided below.



Thank for the greate information sir. This is amazing
Thanks for appreciation.
Hey Thank for this. Worked perfectly.
Thanks
Thank you for sharing such an insightful and well-written article! I really appreciate the depth of knowledge and clear explanations provided. It’s refreshing to see a detailed take on this topic. Looking forward to reading more of your posts!