This article will explain how to install WordPress on localhost. And also, two or more WordPress websites on localhost using Bitnami stack. We can do this using XAMPP too, but the stack is slower than Bitnami. Let’s understand how to install WordPress on localhost using Bitnami.
What is localhost Installation?
Installing an application on your own computer system is called local installation. And now, if the computer serves a URL, when you enter it in the browser is called the localhost URL. That means, “localhost” refers to your computer acting as a server, and the URLs it serves are localhost URLs.

Localhost, represented by the IP address 127.0.0.1, refers to the computer on which the website runs locally. It’s a self-reference used mainly for testing and development. You usually contact another computer system online when you call an IP address. But when you call 127.0.0.1, you’re communicating with your own computer. So here we are installing WordPress on our localhost server.
WordPress on Localhost
WordPress is one of the best Content Management Systems (CMS) for blogging, with a 63.5% share all around the internet. You can run WordPress for blogging and other purposes. But before setting up the live server, we can install WordPress on localhost for design, development, and testing.
To install WordPress on your localhost computer, we have to create the environment, or software will be required to run the WordPress CMS. WordPress is designed using PHP; its backend needs a database and a server to serve the files to the browser. So our localhost will contain the following applications for the WordPress CMS.
- PHP (We’ll install the Latest Version)
- Database Management System – We’ll use MariaDB
- Apache Server
- PHPMyAdmin to access the database,
In this tutorial guide, we are using Bitnami, but we can also use XAMPP for WordPress localhost.
We will also understand how to install WordPress on multiple sites.
Install WordPress on the localhost server on your machine.
Bitnami stack provides the complete bundle of software to run WordPress on localhost. If you want to run WordPress and PHP applications using localhost, we recommend installing the Bitnami WordPress Stack on your computer.
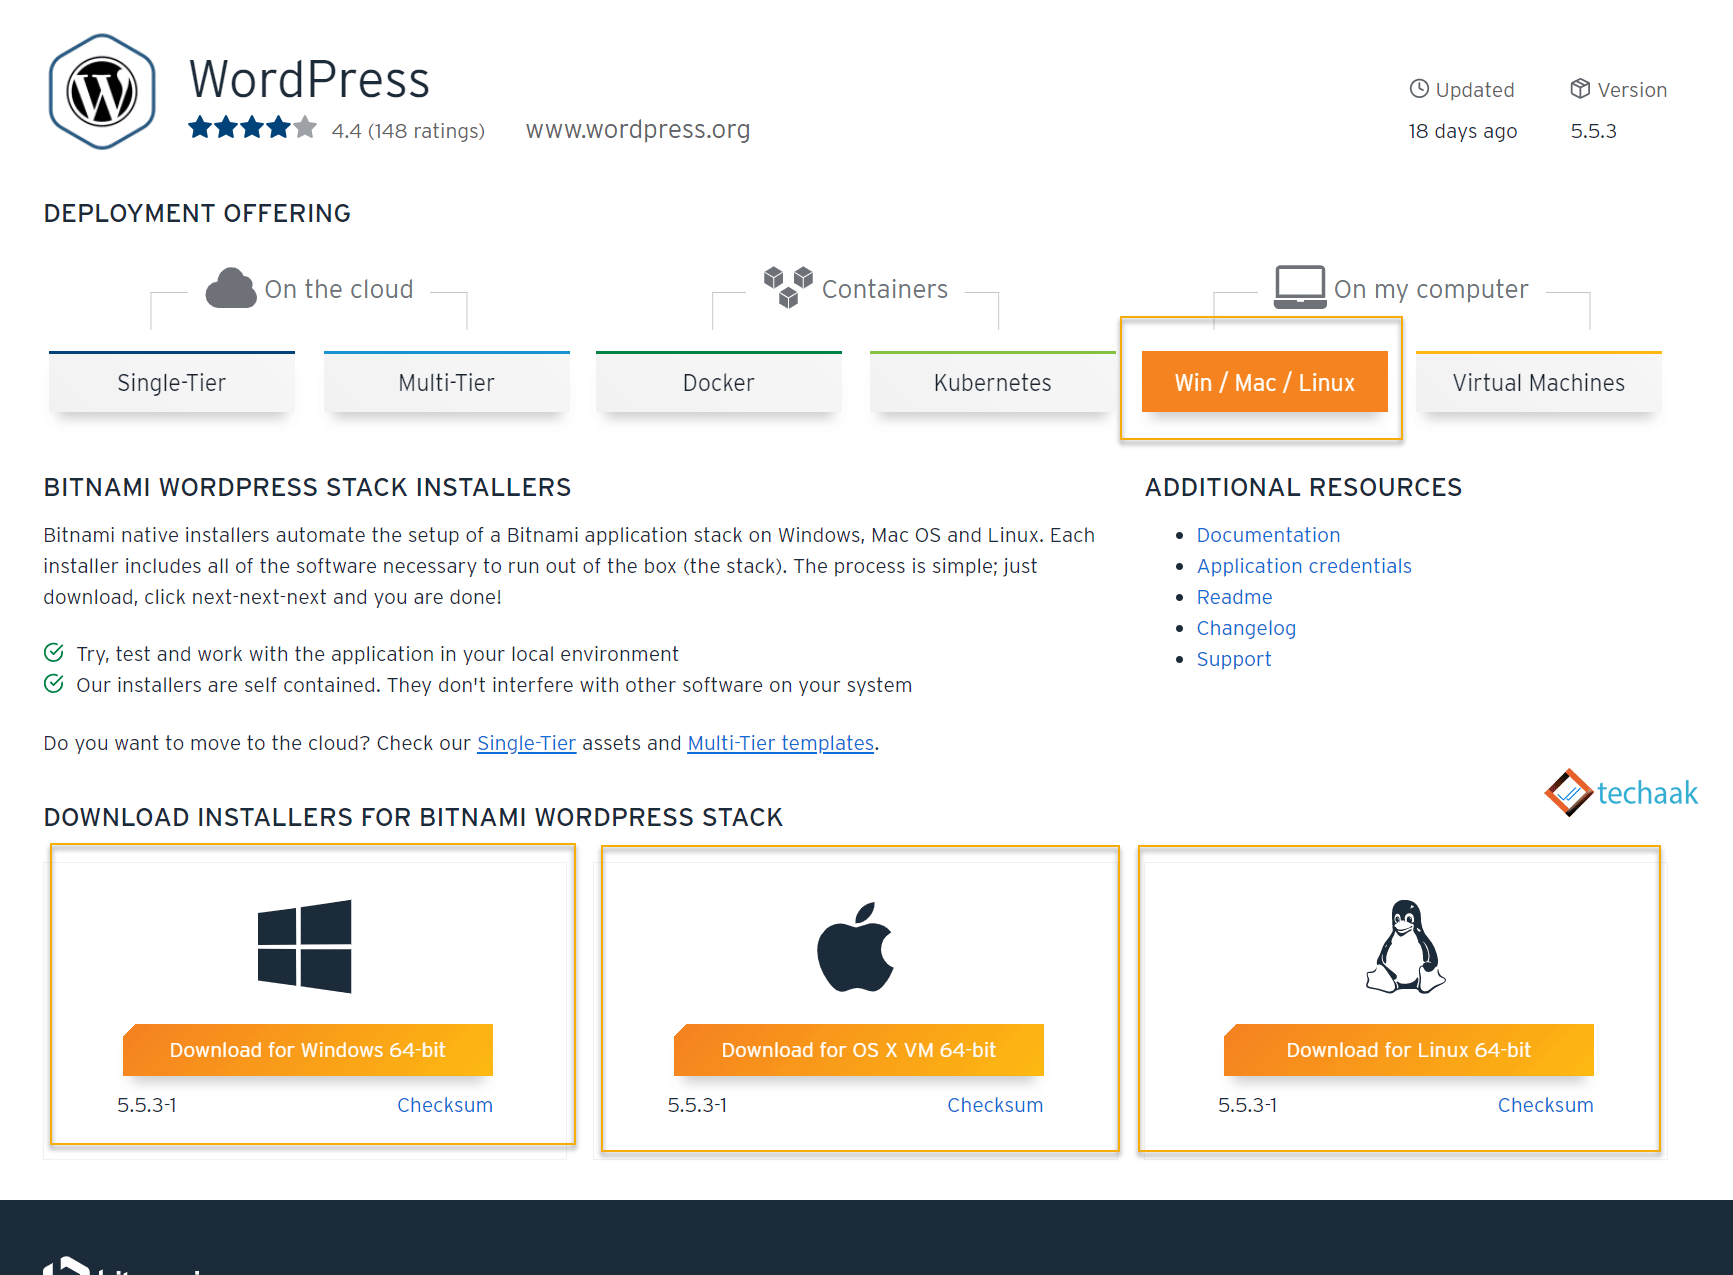
Download Bitnami WordPress stack for Windows.
First, download the latest version of the Bitnami WordPress stack. The latest updates are fast, stable, and contain the latest version of all the applications.
Download and Install Bitnami WordPress for localhost.

Through the above link, you will be able to download the Bitnami WordPress stack for Windows.
Here we’re guiding for Windows 10 64-bit. The process is nearly similar to other Operating Systems too.
- Download the Bitnami Stack Application, Right-click on setup, and select Run as administrator.
- An install window will pop up – select YES.
- Select your language now(default English).
- On the Bitnami WordPress Stack page- click on Next.
- Keep both PHPMyAdmin and WordPress marked.
- Select the custom installation folder(if you want to install it in a different folder, otherwise, leave it as it is. I changed it to C:\Bitnami\wp-bitnami).
Installation Folder and Admin Account.
Here, you have to choose the folder to install the Bitnami WordPress stack. And in Admin Account, we’ll provide details about the admin who will run the application.

This will install the Bitnami stack to the selected folder. After selecting the folder, click on the Next button.

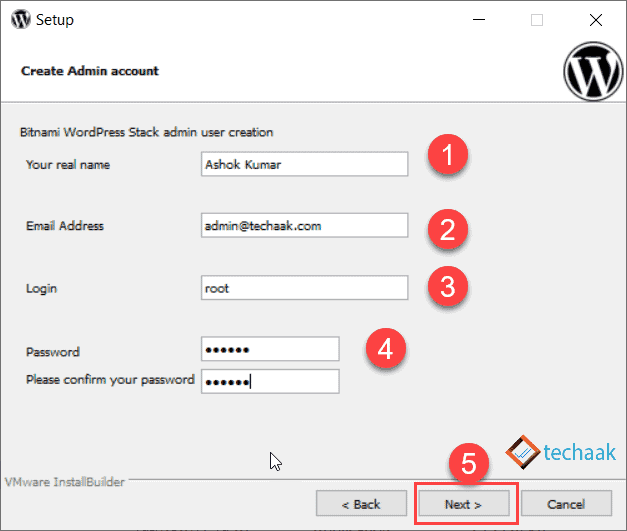
In this window, you’ve to create the admin account. This admin account is the same for both WordPress and phpMyAdmin. So do it carefully.
- Enter the name, email, and login username on the next setup page.
- Enter Your name
- Your email address
- Enter the username for login (for this tutorial, we enter “root”)
- Please enter the password and confirm it by re-entering the same. (for this tutorial, we’re choosing password 123123, you can choose a tough one.)
- Click on Next
From the above, you’ve to remember login details for WordPress and phpMyAdmin. Now click on next, and WordPress Bitnami will install on your computer. However, it will take a few minutes to install the WordPress CMS on your machine; wait for it.
And you did it! WordPress is now installed on localhost, and you have to access it.
Access WordPress Bitnami from your localhost
Enter the URL http://localhost/wordpress, and press enter to access the WordPress homepage. To make changes to it, you’ve to log in on the dashboard using the URL http://localhost/wordpress/wp-login.php.
The IP for the localhost is 127.0.0.1, so you can also access the localhost using this IP address. The URL will be http://127.0.0.1/wordpress.
All Done. You can now access localhost WordPress on your machine.
Access PHPMyAdmin
PHPMyAdmin allows you to manage the database. We’re using the MariaDB database management system. You can access it by entering the URL http://localhost/phpmyadmin/, and the login credentials are root and 123123, as provided while creating the admin account in the last step.
Now, all done; you can access and enjoy localhost WordPress, but if you want to install multiple WordPress sites, follow the steps below.
Install Multiple WordPress websites on localhost.
If you want to run more than one WordPress website on the localhost, follow this guide.
Every WordPress website needs a database where it can store all the database values, and it requires a folder in localhost where it can keep all the WordPress application files.
Create a database using phpMyAdmin
This Bitnami stack includes phpMyAdmin to manage the database. First, log in to phpMyAdmin http://localhost/phpmyadmin/ and provide the login credentials. In our case username is “root”, and the password is “123123”.
Here create a new database; suppose your new site name is example.com, then create a database example (for this tutorial, we’ll create a database with the name seoneurons). Follow the steps:
- Click on new on the left-hand side of the panel.
- Enter the database name.
- Click on the Create button.

I created a database with the name seoneurons for the new WordPress website.
Create a Folder for the additional WordPress.
After creating the database, you’ve to download the latest version of WordPress software through the link provided below.
Download the latest version of WordPress.
After downloading this zip file, extract the files of it. Now copy the WordPress folder from the extracted files and place that folder in
C:\Bitnami\wp-bitnami\apache2\htdocs
Now rename this WordPress folder according to your database to avoid mashups. Suppose the database name is seoneurons; rename the “wordpress” folder to “seoneurons”. (You can create a folder with any name, but please keep the same name for the database and folder).
Here, wp-bitnami is the folder where you installed the Bitnami WordPress stack.
Access the WordPress CMS
Now access your new WordPress site installed here http://localhost/seoneurons/. The following window will open up. You’ve to select the language of the WordPress website.

Select the language and click on the continue button. This will redirect you to the following page.

The above page is the welcome page for the WordPress website. It is to inform you that you’ve to provide database values on the following page.

To connect the newly built WordPress website, you’ve to enter the database details. It will connect with the MariaDB database, where you have already created a database for the new website with the name seoneurons.
On the above page, please enter the required data.
- The name of the database you entered in phpMyAdmin, is seoneurons here in this tutorial.
- The user name you choose during the software installation, in our case, is “root”.
- Next, enter the password for the username. In our case, it is 123123.
- Leave this as it is.
- Leave this as it is.
Now you’ll be on the final setup page,

- Enter your website title.
- Choose a username for your site.
- Choose a password for your site.
- please enter your email address
- and leave it as it is
- Click on Install WordPress
If the button is not enabled, check whether your password is strong, or a pop-up will appear to choose a weak password.
Now it’s all done. You can now access this localhost WordPress.
Final Words for WordPress on localhost
In this context, we discussed how to install WordPress on localhost. Provided you download bitnami stack direct link. Through, Bitnami now discounted this, but you can still run this stack without any issues. In the later part, we provided a detailed guide on running multiple WordPress websites on the same server.
After completing the development and testing, you can transfer the localhost WordPress website to production.
If you’ve any doubts, queries, or feedback regarding the localhost installation, feel free to ask in the comment section below.
Thanks so much for your perfect instructions on adding multiple websites.
Welcome 🙂
I am searching on google how to install WordPress on localhost and I find your post. And after reading your article, hopefully, now we can install WordPress easily. Thank you!
Thanks for everything
I really appreciate your information; it’s exactly what I was looking for. Could you tell me which software you use to create such a fast and amazing website? Like you, I want to create a simple website for my business, but I need help deciding on a domain name and web host. It is said that Asphostportal has a stellar reputation. Can you suggest any other options, or are there any others available?