Yoast SEO plugin is one of the best WordPress SEO plugins for technical and On-Page SEO. But if you don’t know how to use it, it will be like you have one of the best cars in the world but don’t know how to drive. This tutorial article will discuss setting up and using the Yoast SEO plugin for the best results in 2023.
Yoast SEO settings are the technical SEO settings; therefore, we have to (especially the setup section) understand the impact of every Yoast SEO section. Some settings may differ for small and large websites and will significantly impact the search result.
What is Yoast SEO Plugin?
Yoast SEO Plugin allows you to customize page structure and enhance technical SEO. We can declare what should be indexed or not and what to include in the sitemap or not.
The Yoast SEO plugin also helps analyze the search engine’s content. There are two features available with this plugin,
- Readability Score: where you can check the toughness of words or sentences used in the article,
- SEO Score: How the search engine can understand the content.
Yoast SEO also generates an XML sitemap for WordPress websites that you can submit to search engines like Google Search Console or Bing Webmaster Tools.
Install Yoast SEO Plugin
To install and set up the Yoast SEO plugin, scroll to WordPress dashboard > Plugin section. Search Yoast and Download Yoast Plugin. Or you can follow our guide on how to install a WordPress plugin.

- Search Yoast SEO Plugin and
- Install Plugin, Or you can download it from the WordPress library and upload it.
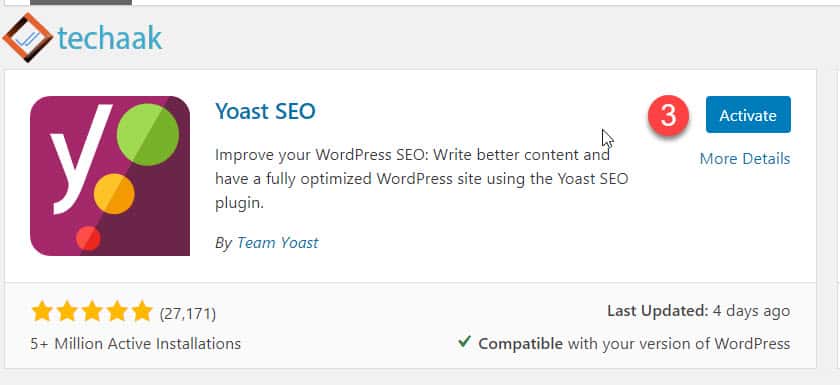
- After Installation, Click on Activate, as shown in the picture above. It will integrate the Yoast SEO plugin with the WordPress website.
General Feature set up for Yoast SEO Plugin.
General Features settings include the most critical part of the SEO like
- SEO Analysis: This will allow you to keep an eye on optimizing content for the search engine.
- Readability analysis: This is the readability score that indicates article hardness,
- Cornerstone content is those content that is not interlinked with other content but is very important for SEO,
- Text Link Counter: counts the total words used in the content,
- XML sitemap: This will generate the XML sitemap for your WordPress website. This XML file included posts and page sitemaps. The index sitemap for the main sitemap includes all sitemaps that can access at https://www.example.com/sitemap_index.xml, where example.com is your website URL.
- Ryte integration: With the help of Ryte, you can analyze your entire website for technical errors and discover optimization potentials.
- Admin bar menu displays the Yoast bar on the top of the WordPress dashboard for Admins.
- Author: This indicates the admin control over the content, not of the author,
- Rest API: That’ll give you all the metadata you need for a specific URL.

You can enable all the features discussed above of the Yoast SEO plugin by navigating to:-
- Scroll to the Yoast SEO dashboard
- Click on the General settings tab.
- Select Features, enable the settings as displayed above, then click on the Save button.
Search Appearance General Settings.
The appearance of your website’s contents in the search results is declared in the search appearance General Settings of the Yoast SEO plugin. That means how should pages or posts appear in the search results.

You can access the search appearance of the website at
- Navigate to Search Appearance, as shown in the image above.
- Click on General Tab for all general settings.
- Select your website or blog type, whether it is Personal or Organization. For a blog type, you can select Organization.
- Provide the organization name or your blog name.
- Logo URL, provide the URL of the logo of your website.
- Save the settings.
Pages and Post content settings in Yoast SEO Plugin
Post and Page content type settings are crucial for the website’s search engine optimization. Yoast SEO allows you to set up posts and page appearance in search results; in other words, we can declare how our website results should appear in the search results. Posts and pages are the most crucial part of a website, so we can’t ignore these settings.

- Click on the Content-Type tab to access content appearance settings.
The content type will include all the content available on your website. The default is posts and pages. In addition, there may be a theme or plugin-generated content. The posts and pages should be allowed to index in the search engine. But for additional content, it will entirely depend on you.
Settings for Single Post URLs.
Yoast SEO allows defining the appearance settings for each single post URL. You can customize the Title or description of the post content.
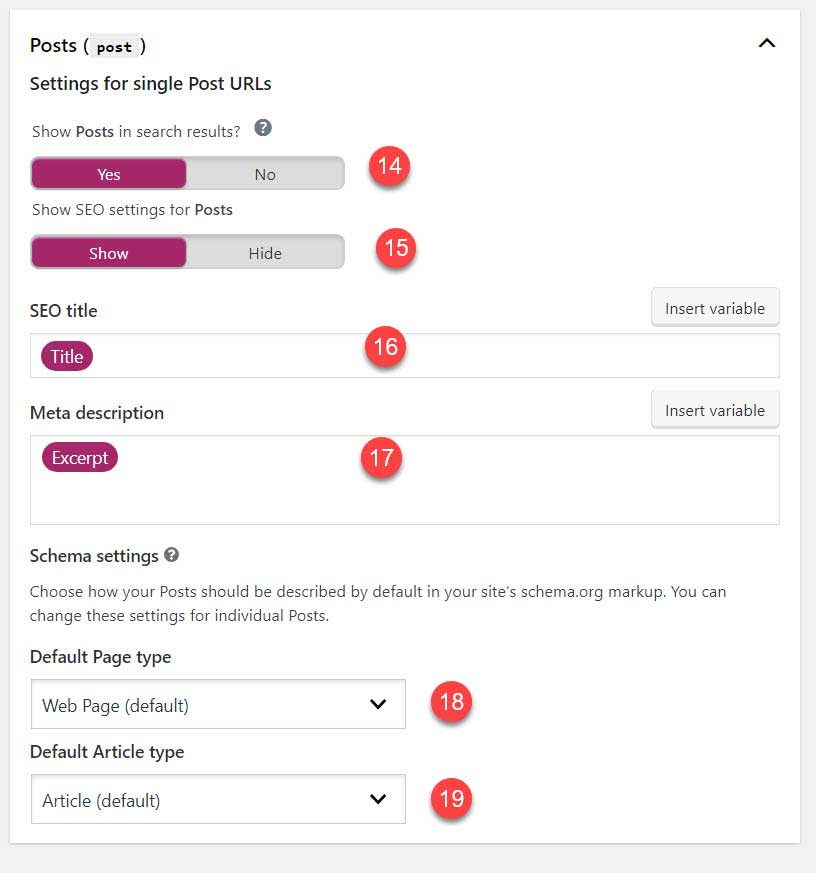
- Show post in Search Result: Enable this feature to allow the search engine to index the post content.
- SEO Settings for Post: Turn on this feature to track the content SEO while creating.
- SEO Title: Set this to the only Title, as the search engine support 60 characters’ Title.
- Meta Description: Enter Excerpt to auto-generate the description of every post. It will generate an auto description from the content. But we advise you to write a meta description of every post separately. You can clear auto Excerpt in the post and manually enter the content description.
- Schema Markup Settings- Page Type: This will provide the schema structure data to your website. The default page type is the webpage.
- Schema Markup Settings–Article Type: Enable this option to generate Schema markup structure data for the WordPress website.
Important for Schema Markup
You enabled Schema markup for your website in the previous step using Yoast SEO. But there could be an issue if your theme is also generating schema markup. So before enabling these, disable the theme’s Schema.
Single Page URLs.
Pages are the permanent type of content of the website. The pages may contain images or may not. That’s why we can’t generate Article type schema markup for pages. The schema markup generates some errors if there is no image in the content. That will result in a JSON-LD mistake in the search console.

- Show pages in the search result: This option will allow the search engine to index the website’s pages.
- SEO Setting for Page: This allows you to track page SEO, Keep this option on.
- SEO Title: Enter the term Title to generate the main heading tag as the Title. You can customize it later for every post.
- Meta Description: You can enter an Excerpt to generate an auto description, but we advise you to leave it blank and provide the description for each post.
- Schema Markup settings: Select the default Webpage type schema markup to avoid errors in the structure data.
- Save changes.
Media Settings for SEO using Yoast Plugin.
The media settings include the media attach to the content. If we don’t define any rule for media content, all the media will be indexed in the search engine separately.
For example, if we did define any media rule for this post, all the images used in this article will index separately.

- Select Media Tab for attachments SEO.
- Select Yes for the attachment URL redirect as shown and save the settings. This will disallow the search engine to index media separately. Instead of that main content will rank.
Taxonomies Settings
Taxonomies define the structure of a website for the user as they include categories, tags, post formats, etc. You may think that website structure must be indexed, right? But it is not so; we can’t index these pages due to duplicate content issues.
You’ll understand why we noindex some pages at the end of this article. You should follow all steps provided here for the best SEO settings.

We’ve to noindex all the Taxonomies for this. So there is no need to change the Title for these pages.
- Click on the Taxonomies Settings tab.
- Show Category in Search Result: You can enable this if the blog has many posts in each category; otherwise, disable it.
- Yoast SEO Meta Box display: Enable these settings, whether you index or noindex the category section.
- Tag in Search Result: No, this will noindex the tags
- Yoast SEO Meta Box display: Show or hidden, as the tags are already noindex, not affecting anything.
- Format-Based Archive: Yes, for user experience.
- Display in Google Search Engine: No, to noindex the archive.
- Category URL Prefix: It’s up to you; if you want to remove “category” in the URL slug, enable else disable.
- Save Settings for Taxonomies.
Archives Settings for Advance SEO
As the name suggests, the archive includes the archive by date and author. To avoid duplicate content issues, we should noindex the archives section.

- Select the Archive Settings Tab for Yoast SEO
- Author Archive: Enabled. This may increase user engagement on the website.
- Author Archive in Search Result: No, to noindex all the author archives.
- Save Archive Settings.
Breadcrumbs Settings in Yoast SEO Plugin.
Breadcrumbs are the navigation tool for a webpage. It can define the location of the webpage to users as well as to search engines.

- Breadcrumbs settings tab for Yoast SEO Plugin
- If you want to display hierarchy in the search results, click it to enable; otherwise, disable it. We recommend that you should enable this feature.
- Now Save settings for breadcrumbs.
RSS Feed settings to protect the content
These are RSS feed injection settings. If you believe someone is copying your website’s content using an RSS feed without your permission. You can add the variable provided to your website’s link in the RSS feed.
So whenever someone fetches the content from your website with the help of the RSS feed, it will automatically add a backlink of your website to the copied post. This backlink helps the search engine to understand the source of the authentic content.

- Yoast SEO RSS settings tab
- It is to protect your RSS feed, so don’t change it and click on the Save button.
You can change the variable if you believe someone is copying the RSS feed’s content.
Yoast SEO edit robots.txt file
Whenever the search engine crawls your website, first, it will interact with the robots.txt file. This file contains the crawling rules that the search engine should follow.
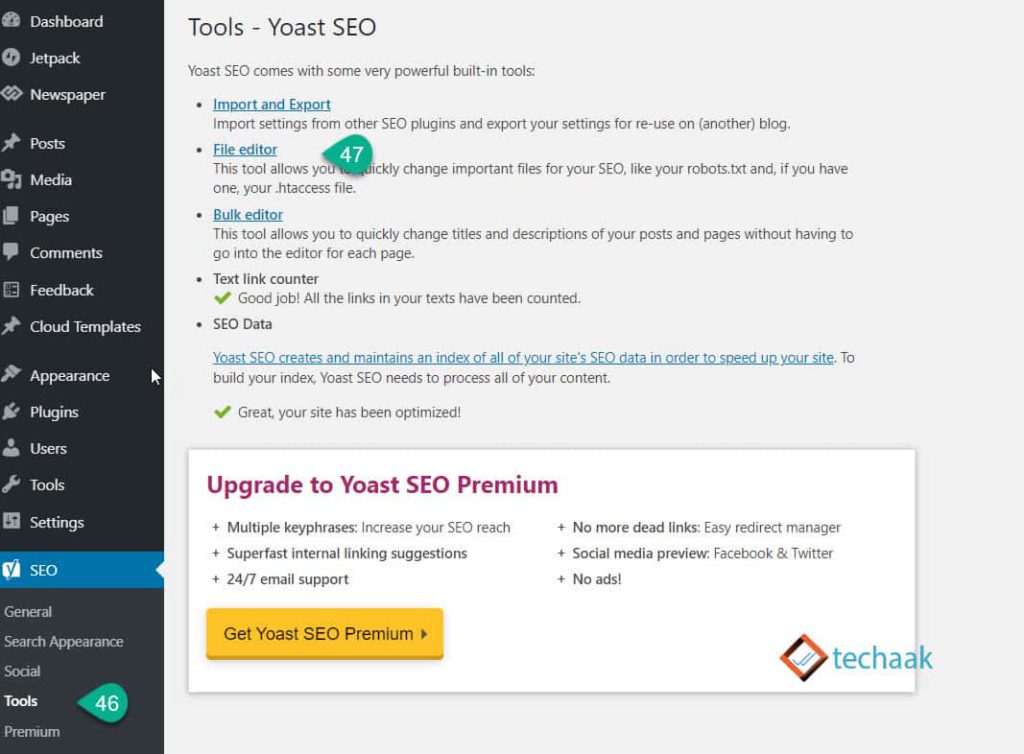
- Scroll to the tools.
- Click on File editor.
User-agent: *
Disallow: /wp-admin/
Allow: /wp-admin/admin-ajax.php
Allow: /
Sitemap: https://yourwebsite.com/sitemap_index.xml
- Enter an SEO-friendly robots.txt file with a sitemap path that doesn’t block the crawling bot. Provide a sitemap.
- Save robots.txt settings.
We index the homepage, pages, and posts for the best SEO settings. Some posts contain multiple categories or tags, and all the links of these tags and categories are interlinked and followed by a search engine bot, which means the same content will be available with different URLs or tags. Categories and tag pages create duplicate content issues and work as junk, so we’ve to noindex such pages.
Robots.txt settings: robots.txt file must contain sitemap/s, so we included that, and to avoid crawling bot error, we allow all the bots(except admin pages).
Final Words for Yoast SEO Plugin set up.
After following all the above steps, Yoast SEO will generate Schema Markup, XML sitemap, and noindex thin content to boost the SEO of your website.
After completing the technical SEO part, one should work on the On-Page SEO part, which includes quality content. Learn how to write SEO-friendly content.
If you face any issues with these settings, please comment below. Thanks. Enjoy your day!
I am searching on google for yoast plugin guideline and I find your post. And after reading your content, hopefully, now we can use yoast plugin easily. Thank you!