Have you completed your WordPress website on the localhost server? And now want to make it available to the public? For this, you have to move your WordPress website to a live server. Let’s understand how you can move your WordPress website from localhost to live server.

There are lots of options available to move the WordPress website from the local host server to the live server. But in this guide, we will talk about the easy one, where you required very few technical skills.
You can go with some plugins and also can directly upload zip files. But it will be best to move a localhost website using a plugin like All in One WP migrate.
Get Start to Move localhost WordPress to the live server.
For the localhost machine, your computer is a plot to build a building(website). But for now, you’ve got to buy a live server, storage, and Domain name. A hosting provider will provide you with a WordPress-ready server and storage.
Hosting: you can buy it from the best hosting providers like Bluehost, Hostinger, SiteGroud, and HostGator. Check which one will suit your needs. Here you can buy hosting suitable for your website as per the number of visitors.
You can buy the domain name from Namecheap, domain.com, BigRock, GoDaddy, etc. You have to choose your domain name carefully so that you don’t have to change it in the future.
After successfully registering your domain and installing the WordPress website, you can move the localhost WordPress to a live server.
Using All-in-One WP Migration Plugin.
Using a plugin to transfer the WordPress website will be an excellent option when you’re not technical.
Take a Backup of localhost WordPress.
First, we have to install the AIO WP migration plugin to both localhost and live WordPress websites. After that, we take a backup from localhost using the migration plugin. Let’s understand how we perform all the actions.
We can create a backup of the localhost WordPress website using the All-in-One WP Migration Plugin. Install and activate the plugin. If you don’t know how to install a plugin, then refer to this article.

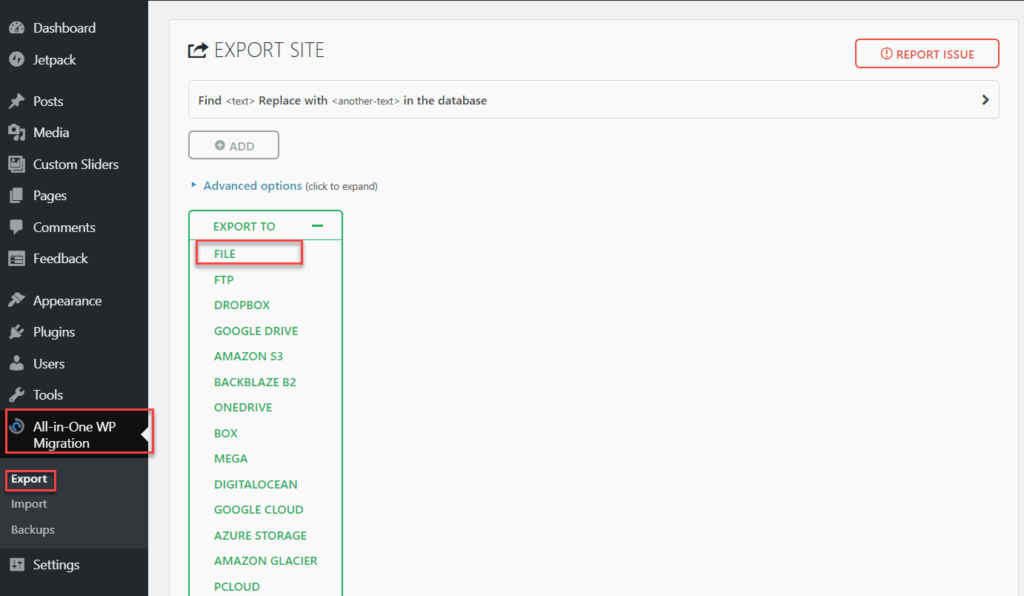
After installation of the plugin, take a backup of the WordPress website. Just scroll to AIO WP migration Plugin settings and then export. You can export the WordPress backup file using the file option, as displayed above.
Export the WordPress file into your machine and save it. Please note that you can now use this backup on any blog or website, so keep it safe and secure.
Before transferring the WordPress website to the live server please make sure that the following:
- Configure Domain name.
- Install SSL certification.
- Domain Configuration to the wp-config.php file.

Go to AIO WP migration > Import, then scroll to the “file” option. And choose the localhost backup file and upload. Please increase the upload file size limit if the file size exceeds the allowed size.
This upload may take a few minutes, depending on the backup file size, server speed, and internet speed.
After successfully uploading the files, you can log in using the localhost ID and passwords. Now your localhost website is live on the internet.
Move WordPress without using any plugins.
We can also move a WordPress website manually from localhost to the live server. You have to perform a little technical task to do this.
Overview
To move the WordPress website without the help of a plugin, download all the WordPress files and MySQL database and upload them to the live server. Let’s understand how to perform this action.
Download the wp-content file and upload it to the Live WordPress website.
From the localhost machine, copy all files to the online server in the wp-content directory. The directory contains all data of the website. You can upload all data of wp-content through FileZilla, cPanel, or hPanel, whichever suits you.
Please note if you manually created some files in the root directory like robots.txt, ads.txt, or any other file. Please drag these files to the live server.
Download and Upload the Database.
You’ve to access the phpMyAdmin of the localhost and export all SQL databases. This database file contains the whole structure of your website.
Export the database:
- In your local development environment, go to phpMyAdmin and select the database for your WordPress site.
- Click on the “Export” tab, select “Custom” as the export method, and choose all tables for your WordPress database.
- Scroll down to the “Output” section and make sure the “Save output to a file” option is selected.
- Click on the “Go” button to download a copy of the database in SQL format

Import SQL Database
- Create a new database on your live server using your hosting control panel.
- In phpMyAdmin, select the newly created database and click the “Import” tab.
- Choose the SQL file you downloaded in step 1 and click the “Go” button to import the database to the live server.

When we move a WordPress website from a localhost development environment to a live server, the domain name and URL change. The database used by WordPress contains many references to the old URL, including links in post content, image URLs, and other metadata.
If you don’t update the site URL in the database after moving WordPress to a new server, your website will not work properly. To update URLs in the database:
- In phpMyAdmin, select the database for your WordPress site on the live server.
- Click on the “SQL” tab and enter the following SQL command: UPDATE wp_options SET option_value = replace(option_value, ‘http://localhost’, ‘http://yourdomain.com’);
- Replace “http://localhost” with the URL of your local development environment and “http://yourdomain.com” with the URL of your live site.
- Click on the “Go” button to execute the SQL command and update the site URL in the database.
Export, Import Database without phpMyAdmin.
If the hosting provider does not provide phpMyAdmin, you need technical skills to move the database. If you think you are not technical, take help from the plugin. Otherwise, follow the guide further.
You can use the command line instead if you don’t want to use phpMyAdmin to export or import your WordPress database. Here are the steps:
Export WordPress Database using Command Line:
- Open Terminal (on Mac/Linux) or Command Prompt (on Windows) and navigate to the directory where you want to export the database.
- Type the following command to export the database.
mysqldump -u username -p database_name > backup.sql
- Replace “username” with your MySQL username, “database_name” with the name of your WordPress database, and “backup.sql” with the name you want to give to the exported SQL file.
- Enter your MySQL password when prompted.
- The exported SQL file will be created in the current directory.
Import WordPress Database using Command Line:
- Open Terminal (on Mac/Linux) or Command Prompt (on Windows) and navigate to your backup SQL file’s directory.
- Type the following command to import the database:
mysql -u username -p database_name < backup.sql- Replace “username” with your MySQL username, “database_name” with the name of your WordPress database, and “backup.sql” with the name of your backup SQL file.
- Enter your MySQL password when prompted.
- The SQL commands in the backup file will be executed, and the database will be imported.
I hope this article will help you in uploading the localhost website to the live server. In case of any doubt or query, feel free to ask in the comment section below.