The Contact Us page allows website users to communicate with the team directly. So that users can send their queries, doubts, feedback, or questions. So, a Contact Us page is essential for your Blogger blog to enable readers to communicate with you. This tutorial will help you to create a functional Contact Us Page for the Blogger blog.

There is a widget feature on the Blogger system. That allows you to add a Contact Us form gadget in the sidebar or footer section of the Blogger. But it does not look professional, to make it professional we will create a dedicated Form page.
Create a Blogger Contact Us Page.
Here, we are providing HTML code for the Contact Us page for the Blogger blog. The below HTML will create a static form with a good design. To make the form functional, follow this guide till the end.
<h2>We'll happy to help you, fill form given below to contact with us.</h2>
<p>We'll like to hear from you. It feels good when you send message to us. If any issue related to broken link of any document or book. We updated link of books/newspaper that are already on internet .. If any issue related to books copyright then please mail us on Email admin@iascgl.com</p>
<div style="text-align: center;">
    <p>Thanks And Regards iascgl.com Team admin@iascgl.com Delhi India</p>
</div>
<div style="text-align: center;color: green;">
    You can reach us by filling this form
</div>
<div class="contact-form-widget">
    <div class="form">
        <form name="contact-form">
            <p></p>
            Name
            <br />
            <input class="contact-form-name" id="ContactForm1_contact-form-name" name="name" size="30" type="text" value="" />
            <p></p>
            Email
            <span style="font-weight: bolder;">*</span>
            <br />
            <input class="contact-form-email" id="ContactForm1_contact-form-email" name="email" size="30" type="text" value="" />
            <p></p>
            Message
            <span style="font-weight: bolder;">*</span>
            <br />
            <textarea class="contact-form-email-message" cols="25" id="ContactForm1_contact-form-email-message" name="email-message" rows="5"></textarea>
            <p></p>
            <input class="contact-form-button contact-form-button-submit" id="ContactForm1_contact-form-submit" type="button" value="Send" />
            <p></p>
            <div style="max-width: 222px; text-align: center; width: 100%;">
                <p class="contact-form-error-message" id="ContactForm1_contact-form-error-message"></p>
                <p class="contact-form-success-message" id="ContactForm1_contact-form-success-message"></p>
            </div>
        </form>
    </div>
</div>
Copy the above code and paste it on the Contact Us page. Publish it after making suitable changes to it. Your static Contact Us form is live. If you don’t know how to create a page, then follow the given guide. To make this form functional, follow the steps below.
Create a Contact form widget and add it to the sidebar or footer of the website.
Earlier, you could generate a Contact Us form with the help of our tool. However, after the recent update of Blogger, a session code was generated with the Contact Us form. So it is now only possible with the help of the Blogger Contact Us form widget.
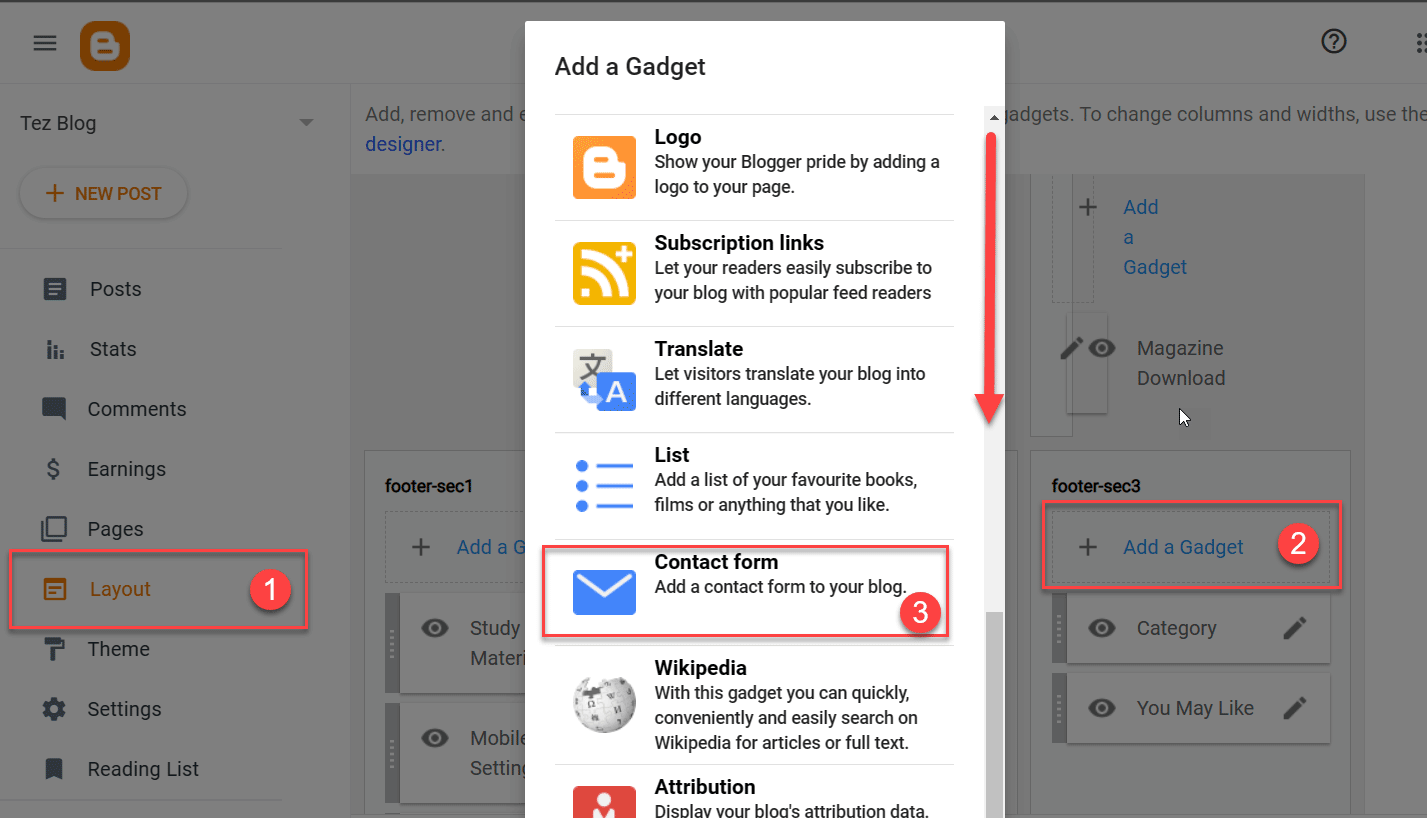
To create a widget in Blogger, visit the layout and create a Contact Us widget in the sidebar. You can create it in the last widget slot of the sidebar.
- Log in to the Blogger Admin Panel and scroll down to Layout.
- Add a widget to the sidebar of the Blogger theme.
- A widget pop-up will appear; scroll down to the Contact form.
Now you’ve to select contact form settings as displayed below.

This will add a contact form to the sidebar of every blog page. But we don’t want our Contact form widget visible on all pages of the website. To remove the form, we’ve to tweak the theme file.
And to edit the Blogger theme, visit Theme>Customize>Edit HTML. Add the following code before the </head> tag.
<style>
#ContactForm1{display:none;}
</style>
Now save the theme file. The above code hides the Contact form from every page.
Please note if you’ve disabled unwanted JavaScript and CSS on Blogger. Then the Contact Us form will not work. Also, you have to ensure no tweaking with the </body> tag.
How to Add a Contact Us Page for the Blogger blog?
Visit your Blogger blog and create a Contact Form Page.
- Create a Contact Us page for the Blogger blog. In HTML mode, paste the above code and publish the page.
- Create a Contact form widget.
- You need a contact form widget to get a working form page.
- Try sending a message using the form.
- You can now try sending messages using the Contact Us form on the website. It would work perfectly.
Create a Blogger Page
To paste the above script, you must enable the HTML mode on the page.
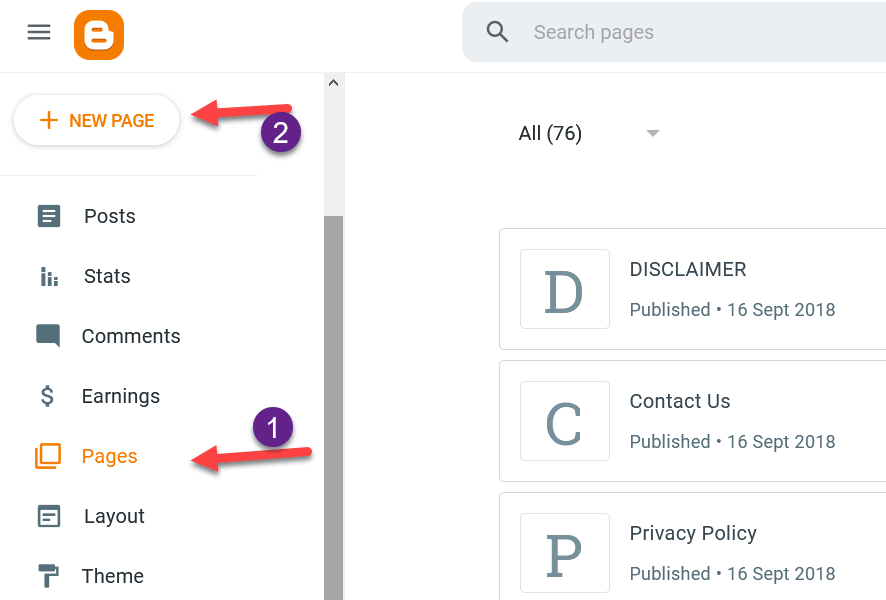
- Visit Blogger Dashboard, Click on Pages
- Now Click on Create New Page.
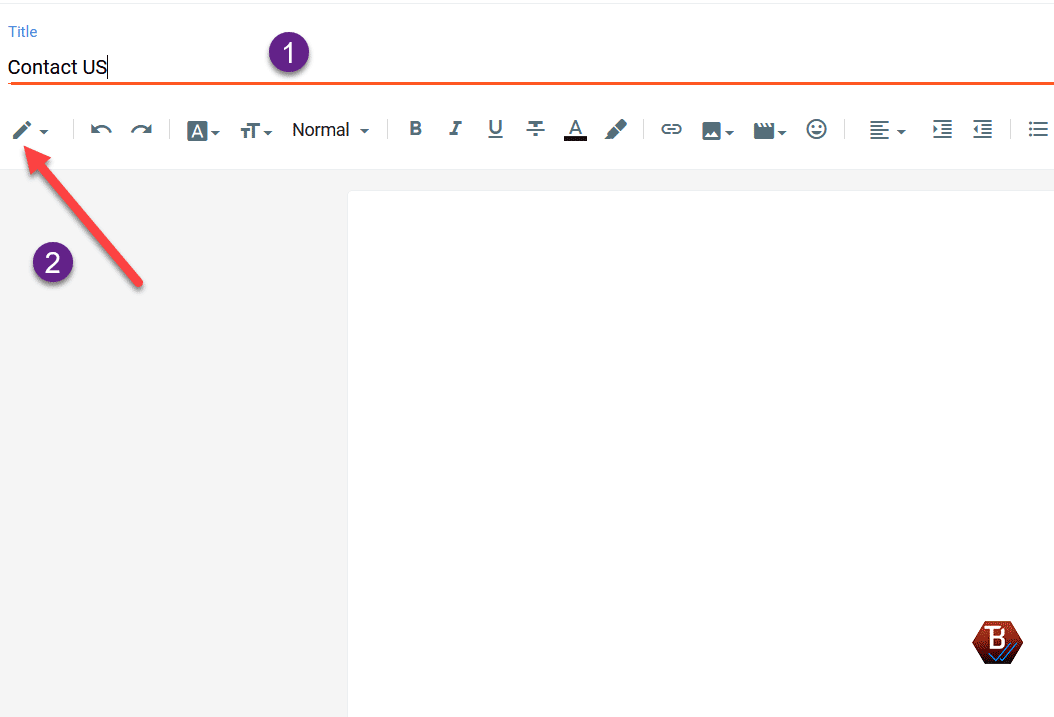
- Enter the Title of the Contact Us page.
- Click on the edit (pencil symbol) to switch to HTML mode.
- Paste the code generated using the above button and publish.
You can now try sending the email address. You’ll receive all emails at the email address linked to Blogger.
Working? You can appreciate our work with your comment below.
Blogger Contact Us Page Not Working? Try This.
If Contact Us doesn’t work, you should check that you are not tweaking the </body> tag. Also, check your Gmail spam folder for the email.
This Contact Us form will work with custom domain names and the subdomain blogspot.com domain.
Final Words
In this article, we understood how to create a Contact Us form page for the Blogger blog. I hope you liked this article. In case of any doubt, feel free to ask in the comment section below. Thank you 🙂
Additional Info: If you want to give your blog a premium look, you can install our BloggerMag or Oyedad Premium Theme for Free. These are advanced SEO-friendly themes.
working thanks bro, godl bless you, if u put in only blogid in one place it works for you and you will recieve the email has been sent from your blog to straight your gmail, but i have one question: How can i change red color of the send button thank you
It work 100%
this worked but I have a “share button” at the top of the form and an “email post” at the bottom of the form .. help please how do I remove those
yep no it doesn’t work won’t send a message
Hello Amanda, how you trying to add the script? Replaced all the values in red line with your own?
And you’re using a default blogger theme. You can try our SEO Frinendly Oyedad Theme for best USER experience.
Download from here. https://seoneurons.com/blogger-seo/seo-friendly-blogger-theme/tezzblog-blogger-xml-theme-download/
Hello, after publishing how do I make it visible? My pages are not visible after publishing.
Seoneurons.com thank you.
It’s an amazing thing you are doing here, keep the good work 😉.
However, it worked but not entirely…
If you are done writing and click on send.. it takes like forever.
And you have to switch to a different tab and back befor it sends the message.
www.thyactivemind.blogspot.com please check.
hi yes changed all the red, and changed the blog id , I am using the “emporio ” template I have tried adding the code manually, and via “advanced add css” even if I get the contact form on there the send button doesn’t work. I ended up putting a google docs contact form on the site, but I will have another crack at it , and try your solution again , I tried different broswers too. this template doesn’t like being changed
OMG Finally!!! ^_^ I tried like 5 codes and yours is the only one that really works! And logical too because the others were not mentioning about the blogger ID. One did, but no message notices and when I tested it still wasn’t sending any message! Thank you so much!
Good Job. Keep Working
Thanks brother.
Thank you very much. this is working,
it is not functioning for me well
Great. This works for me after trying several times without success. Thank you.
kindly show me how to use this type of comment system you use on this blog. thanks
Many thanks! I searched for this severally else but couldn’t find. This post made it quite easy for me. Thanks! It worked.
really! its worked. hope design also better.
I have added the contact us page but visitors cant see it
I think you followed other tutorial and made changes in CSS. You’ve to revert back all earlier changes made for contact us page..
HOW TO HIDE THE ROUNDING CREDITS FOR MY COMPETITORS NOT USING THE SAME THEME AS ME?
Thank you for contact us form, i put in myblog, its working.
I had a hard time adding my blogger contact us form.
Thank you, it works perfectly!
Thanks helpfull post
Thanks For Share This Contact Us Page Generator
thank you it’s work for me
Works like a charm. Thanks so much!
Thanks so much, I have been looking for this form and its code for so long for my blog, it looks way more professional. Thanks a million
Hi, The contact us form was working , but now getting this message ” Message could not be sent. Please try again later.” kindly look into and update accordingly.
In morning time message sent but not receiving in my email
This is because, blogger system detected that you’re spamming.
It’s perfectly worked and looks so amazing. Before I was using Google form for my website. But I think it’s perfect and stunning.
Thank you so much
i am very happy and i really appreciate your hard work to help us your idea and content makes me feel better and when i read i go on to know that this post was really helpful. want to create contract page in blogger that receives mail on gmail then
Hi,
The work is working great. Thanks for the efforts and sharing, appreciated.
Wow… Thankyou. It really works.
Hii It is not working in mobile device please help me
Thank you, 100% Worked
Thank you for this. It works if using the laptop. But it doesn’t work on mobile and iPad. Hope there’s a solution to this. Thanks.
Hello sir please help me i tried more codes and and also I add this code your trick but i can’t receive emails when someone click on send msg button it’s show sending……
Only but it isn’t send successfully please help me check my contact us page
https://www.afgmediaweb.com/p/contact-us.html
Thank you bro. You solved my problem. Excellent free solution.
sending….. but its not sending. how do i fix that?
This is Best ➡Learning point i have ever visited keep it up good work🌹❣️
Thank you so much for this information. I have created a contact us form with your help on my site.
Thanks Its working man!! God Bless You.
i copied same process and its working but last one is not working for me contact widget is not hding for all posts and hompage in bottom side.
now what i do for this issues?
sending….. but its not sending. how do i fix that?
Hi
I can’t see to provide blogger ID before generate html code as you have shown in video, kindly suggest me.
Hi
I can’t see to provide blogger ID before generate html code as you have shown in video, kindly suggest me.
thank you
Thanks Its working fine
Sir, this code is not working on my blog
nice
I tried several times. But code isn’t functioning for me . It shows sending
I try to this part of site but not working
Its much much easier to you a form backend service like https://fabform.io
Its much much easier to use a form backend service like https://fabform.io
You can add a form much easier using https://fabform.io
Hi There.
It was quite easy to create the widget and page.
But unfortunately, it doesn’t send the emails.
Well, maybe it does but I don’t get them in my mailbox.
Also, I’m not clear about the blog id.
Please advise.
Good work Bro. I tried it and sent an email but it just hanged not delivered. It is likely because of the blog ID not reflecng in the above code. Let me know where to put blog ID in the code.
Waiting for your response.
Thank you.
Kenny
not working on my blog
Hi
This is Javed Rana, a senior journalist from Islamabad. Here is my introduction.
https://counternarrative.tv/index.php/jr/
I want to try your blogger mag theme which you said here –is free. I want to try like Oyedad theme. Kindly give me its link for download.
I am serious customer and could buy if your theme works on two websites. See my current theme which is good but it has an issue of contact form and also its archive feature is unreasonable. https://www.muslimnarrative.tv/
Very Great article
From
nextcommcorporation.com
Hi Ashok, i really do need help.
My blog is not showing up on google, and its been a while (3 or 4 months now)
http://thyactivemind.blogspot.com
www.thyactivemind.blogspot.com
https://thyactivemind.blogspot.com/2024/01/from-couch-to-5k-guide-to-your-fitness.html
After following all the steps It is working fine for me but, my post is getting shown like it was pinned and then followed by the contact form. In this article, it was mentioned to add the tag HTML script before tag in the theme HTML code to hide the contact form widget. That’s caused me the blog post-pinning issue.
After I tried moving the HTML script before instead of tag it worked fine. Could you check this and update the article ?
This doesn’t work anymore!
When i shared this post on facebook, then also the text remains locked. Also note that this post has 2023 in it instead of 2024.
Its working for my Probeforebuy Blog.
Thank bro, I try to apply this, this is good coding👍
functioning, but I would like to send emails using any other Email address. Is that even possible?
Thanks Good Info
Thank for add contact us from
Took me so much time to receive this code, this worked like a charm, thank you so so much….